Aston Martin Vantage GT4
用户手册Aston Martin Vantage GT4
User Manual
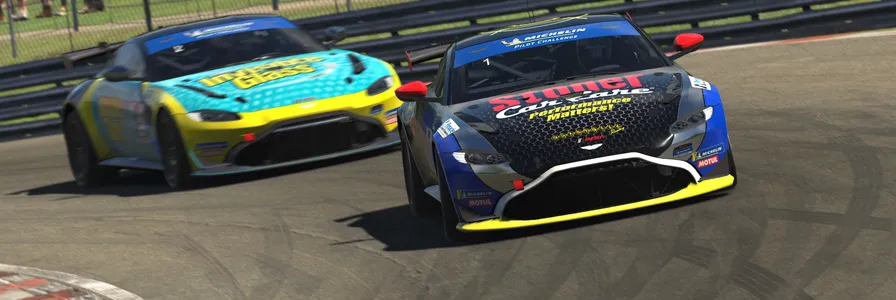
亲爱的 iRacing 用户:
恭喜您购买 Aston Martin Vantage GT4!iRacing 全体成员感谢您的支持以及对我们产品的认可。我们致力于提供极致的模拟赛车体验,也希望您驾驶新车时能在赛道上尽享激情!
Aston Martin 长期以来一直以 Vantage 征战 GT4 规格赛事,这款赛车历经多次改款,拥有数十年的比赛历史。现行规格的 GT4 于 2019 年纽博格林 24 小时耐力赛首次亮相,厂队打造的赛车以四圈优势夺得 SP8T 组别冠军。次年,KohR Motorsports 为 Vantage GT4 赢得首个 IMSA Michelin Pilot Challenge Grand Sport 组别总冠军;车手 Kyle Marcelli 与 Nate Stacy 在中俄亥俄站包揽整个周末的胜利。如今,Vantage GT4 仍活跃在全球众多顶尖 GT4 车队与赛事中。
本指南将说明如何充分发挥新车的性能,涵盖从赛道外的车辆设置调整,到驾驶时在座舱内看到的各种信息。希望本指南能帮助您快速上手。
再次感谢您的购买,我们赛道上见!
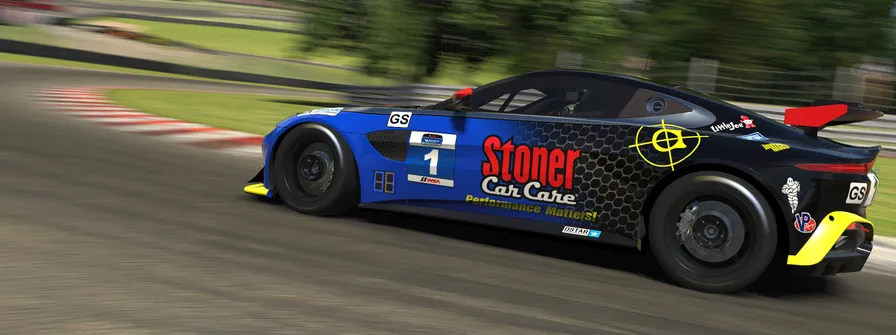
DEAR iRACING USER,
Congratulations on your purchase of the Aston Martin Vantage GT4! From all of us at iRacing, we appreciate your support and your commitment to our product. We aim to deliver the ultimate sim racing experience, and we hope that you’ll find plenty of excitement with us behind the wheel of your new car!
Aston Martin has long used the Vantage as its entry into GT4-spec racing, putting the car through multiple revisions and decades worth of racing history. The current-spec GT4 made its debut in the 2019 24 Hours of Nurburgring, where a factory-prepared entry took the SP8T class win by four laps. The next year, KohR Motorsports gave the Vantage GT4 its first IMSA Michelin Pilot Challenge Grand Sport championship, as drivers Kyle Marcelli and Nate Stacy scored a weekend-sweep at Mid-Ohio. Vantage GT4s remain in use with many of the top GT4 programs and events around the world.
The following guide explains how to get the most out of your new car, from how to adjust its settings off of the track to what you’ll see inside of the cockpit while driving. We hope that you’ll find it useful in getting up to speed.
Thanks again for your purchase, and we’ll see you on the track!
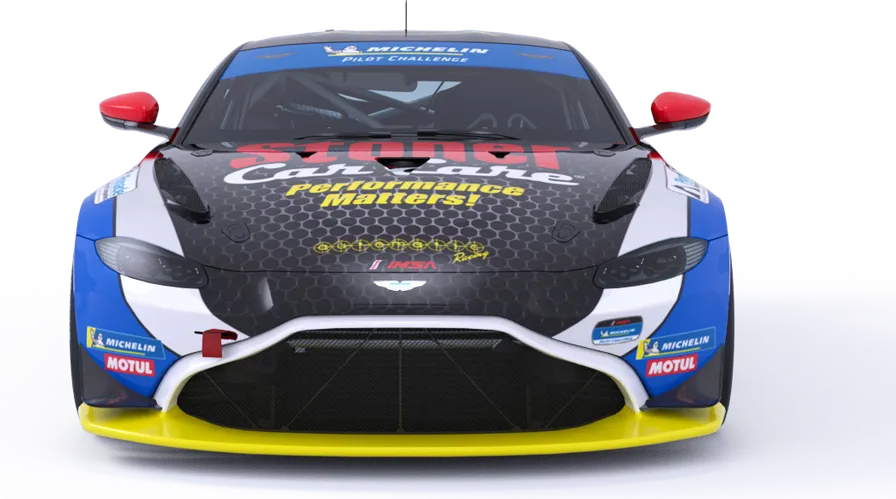
技术规格TECH SPECS
底盘CHASSIS
前悬架采用双叉臂结构,后悬架采用多连杆结构。
| 规格 | 数值 |
|---|---|
| 车长 | 4520 mm / 178.0 in |
| 车宽 | 1948 mm / 76.7 in |
| 轴距 | 2703 mm / 106.7 in |
| 干重 | 1283 kg / 106.4 lbs |
| 含车手湿重(含油液) | 1464 kg / 3477 lbs |
FRONT DOUBLE WISHBONE AND REAR MULTI-LINK SUSPENSION.
| Specification | Value |
|---|---|
| Length | 4520 mm / 178.0 in |
| Width | 1948 mm / 76.7 in |
| Wheelbase | 2703 mm / 106.7 in |
| Dry Weight | 1283 kg / 106.4 lbs |
| Wet Weight with Driver (Including Fluids) | 1464 kg / 3477 lbs |
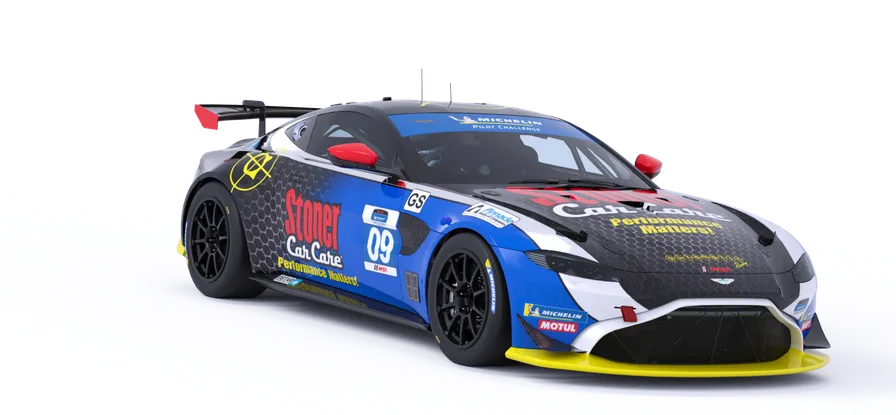
动力单元POWER UNIT
双涡轮增压铝合金 90° V8 发动机
| 规格 | 数值 |
|---|---|
| 排量 | 4.0 升 / 244.1 cid |
| 扭矩 | 425 lb-ft / 576 Nm |
| 功率 | 460 bhp / 343 kW |
| 转速上限 | 7175 RPM |
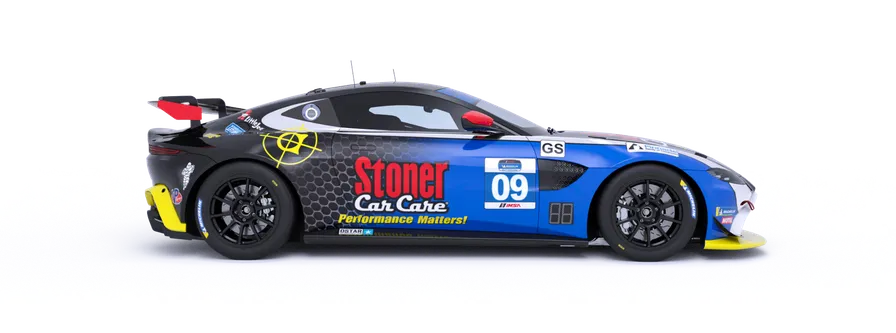
TWIN-TURBO ALUMINUM 90 DEGREE V8
| Specification | Value |
|---|---|
| Displacement | 4.0 Liters / 244.1 cid |
| Torque | 425 lb-ft / 576 Nm |
| Power | 460 bhp / 343 kW |
| RPM Limit | 7175 |
简介INTRODUCTION
本指南旨在帮助您深入理解车库中可用的底盘设置选项,以便按照个人偏好调校车辆。
启动车辆前,建议先为制动力分配、TC 和 ABS 设置映射控制按键。虽然这并非必要操作,但可让您在赛道上根据驾驶风格快速调整制动力分配和车辆稳定性管理系统。
进入车辆后,只需拉动“升挡”拨片挂入挡位,再踩下油门踏板即可起步。本车采用自动化序列式变速箱,升挡和降挡均无须手动操作离合器。不过,降挡保护会在系统判断当前车速相对于请求挡位过高时阻止降挡;此时,降挡指令会被直接忽略。
建议在仪表台上的所有换挡提示灯全部亮起时升挡,对应转速约为 6750 RPM。
The information found in this guide is intended to provide a deeper understanding of the chassis setup adjustments available in the garage, so that you may use the garage to tune the chassis setup to your preference.
Before starting the car, it is recommended to map controls for Brake Bias, TC and ABS settings. While this is not mandatory, this will allow you to make quick changes to the brake bias and stability management systems to suit your driving style while out on track.
Once you load into the car, getting started is as easy as pulling the “upshift” paddle to put it into gear, and hitting the accelerator pedal. This car uses an automated sequential transmission and does not require manual clutch operation to shift in either direction. However, the car’s downshift protection will not allow you to downshift if it feels you are traveling too fast for the gear requested. If that is the case, the downshift command will simply be ignored.
Upshifting is recommended when the shift lights on the dashboard are all fully illuminated. This is at approximately 6750 rpm.
快速上手GETTING STARTED
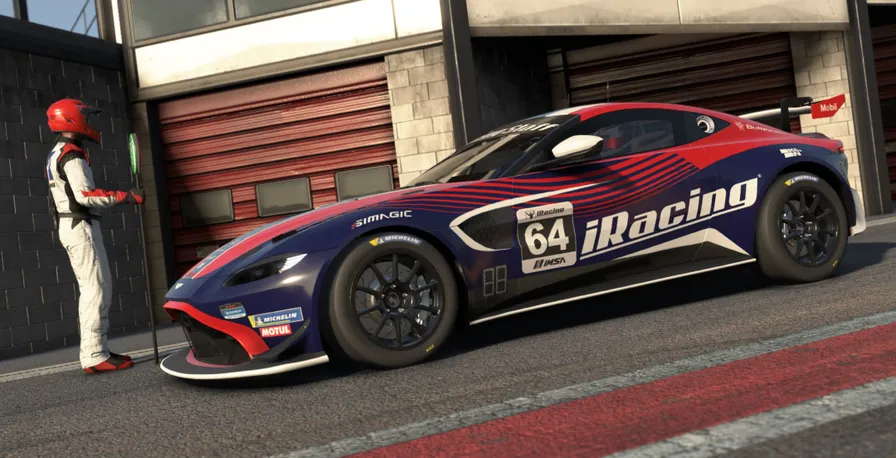
启动车辆前,建议先为制动力分配、TC 和 ABS 设置映射控制按键。虽然这并非必要操作,但可让您在赛道上根据驾驶风格快速调整制动力分配和车辆稳定性管理系统。进入车辆后,只需拉动“升挡”拨片挂入挡位,再踩下油门踏板即可起步。
本车采用自动化序列式变速箱,升挡和降挡均无须手动操作离合器。不过,降挡保护会在系统判断当前车速相对于请求挡位过高时阻止降挡;此时,降挡指令会被直接忽略。建议在仪表台上的所有换挡提示灯全部亮起时升挡,对应转速约为 6750 RPM。
Before starting the car, it is recommended to map controls for Brake Bias, TC and ABS settings. While this is not mandatory, this will allow you to make quick changes to the brake bias and stability management systems to suit your driving style while out on track. Once you load into the car, getting started is as easy as pulling the “upshift” paddle to put it into gear, and hitting the accelerator pedal.
This car uses an automated sequential transmission and does not require manual clutch operation to shift in either direction. However, the car’s downshift protection will not allow you to downshift if it feels you are traveling too fast for the gear requested. If that is the case, the downshift command will simply be ignored. Upshifting is recommended when the shift lights on the dashboard are all fully illuminated. This is at approximately 6750 rpm.
载入 iRacing 设置LOADING AN iRACING SETUP
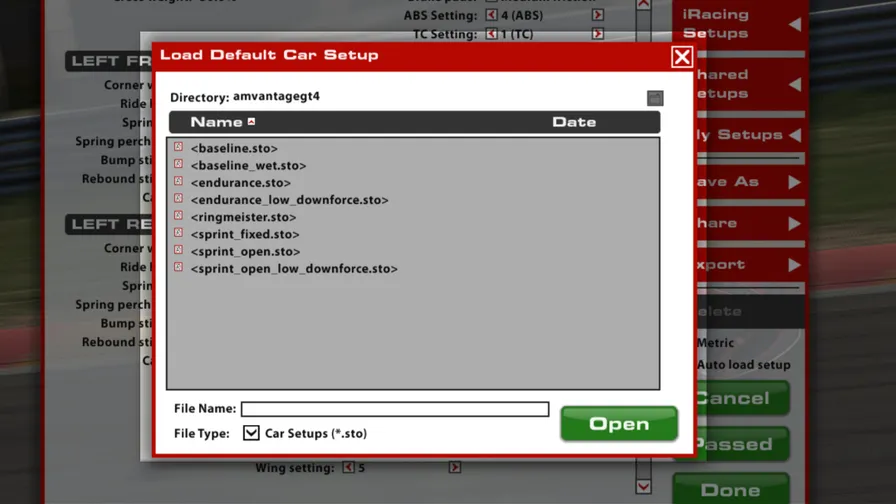
进入比赛会话后,车辆会自动载入 iRacing 基准设置 [baseline.sto]。如果您希望使用 iRacing 针对不同条件预制的其他设置,可以依次单击“车库 > iRacing 设置 >”,再选择符合需求的设置。
如需自定义设置,只需在车库中完成所需修改,然后单击“应用”。
若要保存设置供日后使用,请单击右侧的“另存为”,为修改后的设置命名并保存。要查看所有个人设置,请单击车库右侧的“我的设置”。
如需与另一位车手或会话中的所有人共享设置,可以单击车库右侧的“共享”。
如果其他车手正在与您共享设置,也可以在车库右侧的“共享设置”中找到该设置。
Upon loading into a session, the car will automatically load the iRacing Baseline setup [baseline.sto]. If you would prefer one of iRacing’s pre-built setups that suit various conditions, you may load it by clicking Garage > iRacing Setups > and then selecting the setup to suit your needs.
If you would like to customize the setup, simply make the changes in the garage that you would like to update and click apply.
If you would like to save your setup for future use click “Save As” on the right to name and save the changes. To access all of your personally saved setups, click “My Setups” on the right side of the garage.
If you would like to share a setup with another driver or everyone in a session, you can select “Share” on the right side of the garage to do so.
If a driver is trying to share a setup with you, you will find it under “Shared Setups” on the right side of the garage as well.
仪表配置DASH CONFIGURATION
本车的仪表显示可调整,共有三个可选页面,分别显示不同层级的车辆信息。
The dash display in this car is adjustable and features three selectable pages to display differing levels of vehicle information.
仪表页面 1DASH PAGE 1
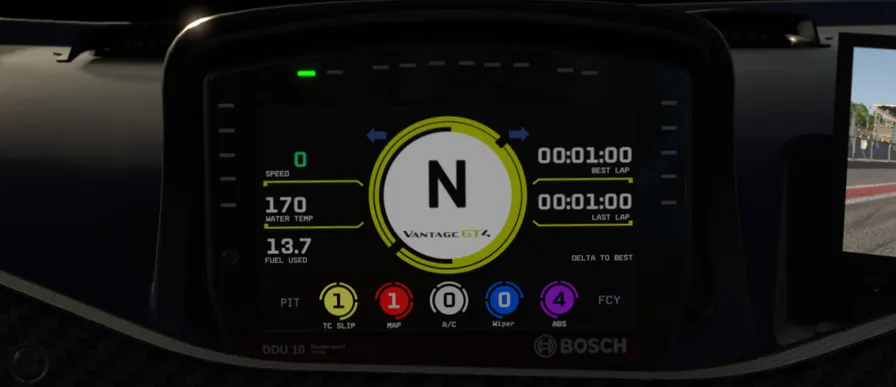
| 指示灯 | 说明 |
|---|---|
| 左侧灯组 | 左侧车轮抱死指示灯。最上方两颗亮蓝色表示左前轮抱死,最下方两颗亮蓝色表示左后轮抱死。发动机熄火时,灯组中的第二和第三颗灯也会闪烁红色。 |
| 右侧灯组 | 右侧车轮抱死指示灯。最上方两颗亮蓝色表示右前轮抱死,最下方两颗亮蓝色表示右后轮抱死。发动机熄火时,灯组中的第二和第三颗灯也会闪烁红色。 |
| 屏幕 | 说明 |
|---|---|
| 第 1 行左侧 — Speed | 车辆速度(km/h 或 mph) |
| 第 1 行中央 | 当前选择的挡位 |
| 第 1 行右侧 — Best Lap | 本次会话最佳圈速,格式为 mm:ss:ms |
| 第 2 行左侧 — Water Temp | 发动机冷却液温度(°C 或 °F) |
| 第 2 行右侧 — Last Lap | 上一完整圈的圈速,格式为 mm:ss:ms |
| 第 3 行左侧 — Fuel Used | 相对于满箱已消耗的燃油量(升或美制加仑) |
| 第 3 行右侧 — Delta | 当前圈相对于最佳圈的实时圈速差,格式为 ss:ms |
| 第 4 行左侧 — Pit | 维修区限速器指示;启用限速器时亮绿色 |
| 第 4 行左起第二项 — TC | 当前牵引力控制设置 |
| 第 4 行左起第三项 — MAP | 当前发动机映射设置(不可调整) |
| 第 4 行中央 — A/C | 当前空调设置(不可调整) |
| 第 4 行右起第三项 — Wiper | 当前风挡雨刷设置 |
| 第 4 行右起第二项 — ABS | 当前 ABS 设置 |
| 第 4 行右侧 — FCY | 全场黄旗指示灯 |
| Lights | Description |
|---|---|
| Left Light Stack | Left side wheel lockup indicators. The uppermost two will illuminate in blue to indicate a LF lockup while the lowermost two will illuminate in blue to indicate a LR lockup. The second and third lights in the stack will also flash red when the engine is stalled. |
| Right Light Stack | Right side wheel lockup indicators. The uppermost two will illuminate in blue to indicate a RF lockup while the lowermost two will illuminate in blue to indicate a RR lockup. The second and third lights in the stack will also flash red when the engine is stalled. |
| Screen | Description |
|---|---|
| Row 1 Left - Speed | Road speed (km/h or mph) |
| Row 1 Center | Currently selected gear |
| Row 1 Right - Best Lap | Session best lap time as mm:ss:ms |
| Row 2 Left - Water Temp | Engine water temperature (Celsius or Fahrenheit). |
| Row 2 Right - Last Lap | Last lap time as mm:ss:ms |
| Row 3 Left - Fuel Used | Fuel used relative to a full tank (Liters or US Gallons) |
| Row 3 Right - Delta | Current lap time delta to best lap as ss:ms |
| Row 4 Left - Pit | Pit limiter indicator, illuminates green when the pit limiter is active |
| Row 4 Second from left - TC | Current traction control setting |
| Row 4 Third from left - MAP | Current engine map setting (non-adjustable) |
| Row 4 Center - A/C | Current air conditioning setting (non-adjustable) |
| Row 4 Third from right - Wiper | Current windscreen wiper setting |
| Row 4 Second from right - ABS | Current ABS setting |
| Row 4 Right - FCY | FCY indicator |
仪表页面 2DASH PAGE 2
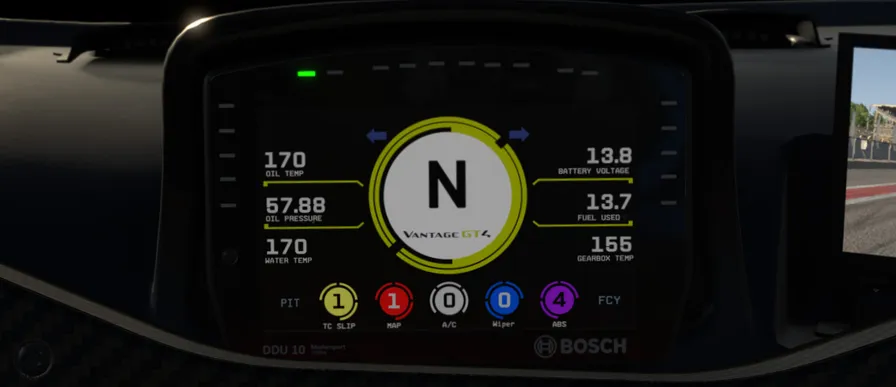
| 指示灯 | 说明 |
|---|---|
| 左侧灯组 | 左侧车轮抱死指示灯。最上方两颗亮蓝色表示左前轮抱死,最下方两颗亮蓝色表示左后轮抱死。发动机熄火时,灯组中的第二和第三颗灯也会闪烁红色。 |
| 右侧灯组 | 右侧车轮抱死指示灯。最上方两颗亮蓝色表示右前轮抱死,最下方两颗亮蓝色表示右后轮抱死。发动机熄火时,灯组中的第二和第三颗灯也会闪烁红色。 |
| 屏幕 | 说明 |
|---|---|
| 第 1 行左侧 — Oil Temp | 发动机机油温度(°C 或 °F) |
| 第 1 行中央 | 当前选择的挡位 |
| 第 1 行右侧 — Battery Voltage | 蓄电池电压(V) |
| 第 2 行左侧 — Oil Pressure | 发动机机油压力(bar 或 psi) |
| 第 2 行右侧 — Fuel Used | 相对于满箱已消耗的燃油量(升或美制加仑) |
| 第 3 行左侧 — Water Temp | 发动机冷却液温度(°C 或 °F) |
| 第 3 行右侧 — Gearbox Temp | 变速箱油温(°C 或 °F) |
| 第 4 行左侧 — Pit | 维修区限速器指示;启用限速器时亮绿色 |
| 第 4 行左起第二项 — TC | 当前牵引力控制设置 |
| 第 4 行左起第三项 — MAP | 当前发动机映射设置(不可调整) |
| 第 4 行中央 — A/C | 当前空调设置(不可调整) |
| 第 4 行右起第三项 — Wiper | 当前风挡雨刷设置 |
| 第 4 行右起第二项 — ABS | 当前 ABS 设置 |
| 第 4 行右侧 — FCY | 全场黄旗指示灯 |
| Lights | Description |
|---|---|
| Left Light Stack | Left side wheel lockup indicators. The uppermost two will illuminate in blue to indicate a LF lockup while the lowermost two will illuminate in blue to indicate a LR lockup. The second and third lights in the stack will also flash red when the engine is stalled. |
| Right Light Stack | Right side wheel lockup indicators. The uppermost two will illuminate in blue to indicate a RF lockup while the lowermost two will illuminate in blue to indicate a RR lockup. The second and third lights in the stack will also flash red when the engine is stalled. |
| Screen | Description |
|---|---|
| Row 1 Left - Oil Temp | Engine oil temperature (Celsius or Fahrenheit) |
| Row 1 Center | Currently selected gear |
| Row 1 Right - Battery Voltage | Battery voltage (Volts) |
| Row 2 Left - Oil Pressure | Engine oil pressure (bar or psi) |
| Row 2 Right - Fuel Used | Fuel used relative to a full tank (Liters or US Gallons) |
| Row 3 Left - Water Temp | Engine water temperature (Celsius or Fahrenheit) |
| Row 3 Right - Gearbox Temp | Gearbox oil temperature (Celsius or Fahrenheit) |
| Row 4 Left - Pit | Pit limiter indicator, illuminates green when the pit limiter is active |
| Row 4 Second from left - TC | Current traction control setting |
| Row 4 Third from left - MAP | Current engine map setting (non-adjustable) |
| Row 4 Center - A/C | Current air conditioning setting (non-adjustable) |
| Row 4 Third from right - Wiper | Current windscreen wiper setting |
| Row 4 Second from right - ABS | Current ABS setting |
| Row 4 Right - FCY | FCY indicator |
仪表页面 3DASH PAGE 3
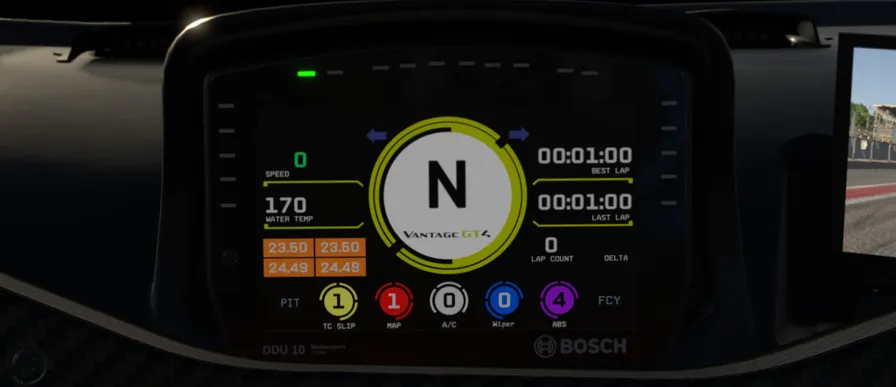
| 指示灯 | 说明 |
|---|---|
| 左侧灯组 | 左侧车轮抱死指示灯。最上方两颗亮蓝色表示左前轮抱死,最下方两颗亮蓝色表示左后轮抱死。发动机熄火时,灯组中的第二和第三颗灯也会闪烁红色。 |
| 右侧灯组 | 右侧车轮抱死指示灯。最上方两颗亮蓝色表示右前轮抱死,最下方两颗亮蓝色表示右后轮抱死。发动机熄火时,灯组中的第二和第三颗灯也会闪烁红色。 |
| 屏幕 | 说明 |
|---|---|
| 第 1 行左侧 — Speed | 车辆速度(km/h 或 mph) |
| 第 1 行中央 | 当前选择的挡位 |
| 第 1 行右侧 — Best Lap | 本次会话最佳圈速,格式为 mm:ss:ms |
| 第 2 行左侧 — Water Temp | 发动机冷却液温度(°C 或 °F) |
| 第 2 行右侧 — Last Lap | 上一完整圈的圈速,格式为 mm:ss:ms |
| 第 3 行左侧 | 当前胎压:上排为左前/右前,下排为左后/右后(kPa 或 psi) |
| 第 3 行右侧 — Lap Count | 本次会话当前圈数,以及当前圈相对于最佳圈的实时圈速差(ss:ms) |
| 第 4 行左侧 — Pit | 维修区限速器指示;启用限速器时亮绿色 |
| 第 4 行左起第二项 — TC | 当前牵引力控制设置 |
| 第 4 行左起第三项 — MAP | 当前发动机映射设置(不可调整) |
| 第 4 行中央 — A/C | 当前空调设置(不可调整) |
| 第 4 行右起第三项 — Wiper | 当前风挡雨刷设置 |
| 第 4 行右起第二项 — ABS | 当前 ABS 设置 |
| 第 4 行右侧 — FCY | 全场黄旗指示灯 |
| Lights | Description |
|---|---|
| Left Light Stack | Left side wheel lockup indicators. The uppermost two will illuminate in blue to indicate a LF lockup while the lowermost two will illuminate in blue to indicate a LR lockup. The second and third lights in the stack will also flash red when the engine is stalled. |
| Right Light Stack | Right side wheel lockup indicators. The uppermost two will illuminate in blue to indicate a RF lockup while the lowermost two will illuminate in blue to indicate a RR lockup. The second and third lights in the stack will also flash red when the engine is stalled. |
| Screen | Description |
|---|---|
| Row 1 Left - Speed | Road speed (km/h or mph) |
| Row 1 Center | Currently selected gear |
| Row 1 Right - Best Lap | Session best lap time as mm:ss:ms |
| Row 2 Left - Water Temp | Engine water temperature (Celsius or Fahrenheit) |
| Row 2 Right - Last Lap | Last lap time as mm:ss:ms |
| Row 3 Left | Current tire pressures LF/RF top row, LR/RR bottom row (kPa or psi) |
| Row 3 Right - Lap Count | Current session lap count and current lap time delta to best lap as ss:ms |
| Row 4 Left - Pit | Pit limiter indicator, illuminates green when the pit limiter is active |
| Row 4 Second from left - TC | Current traction control setting |
| Row 4 Third from left - MAP | Current engine map setting (non-adjustable) |
| Row 4 Center - A/C | Current air conditioning setting (non-adjustable) |
| Row 4 Third from right - Wiper | Current windscreen wiper setting |
| Row 4 Second from right - ABS | Current ABS setting |
| Row 4 Right - FCY | FCY indicator |
维修区限速器PIT SPEED LIMITER
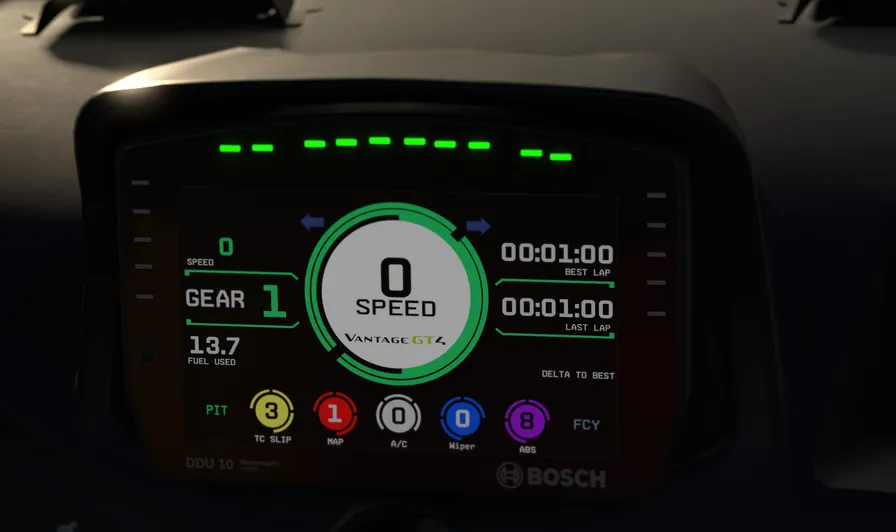
启用维修区限速器后,所有换挡提示灯都会开始闪烁绿色,仪表台上的“pit”文字会亮起,显示图形也会由黄色变为绿色。
When the pit limiter is active all shift lights will begin to flash in green, the ‘pit’ text will illuminate on the dashboard and the display graphics will change from yellow to green.
换挡提示灯SHIFT LIGHTS
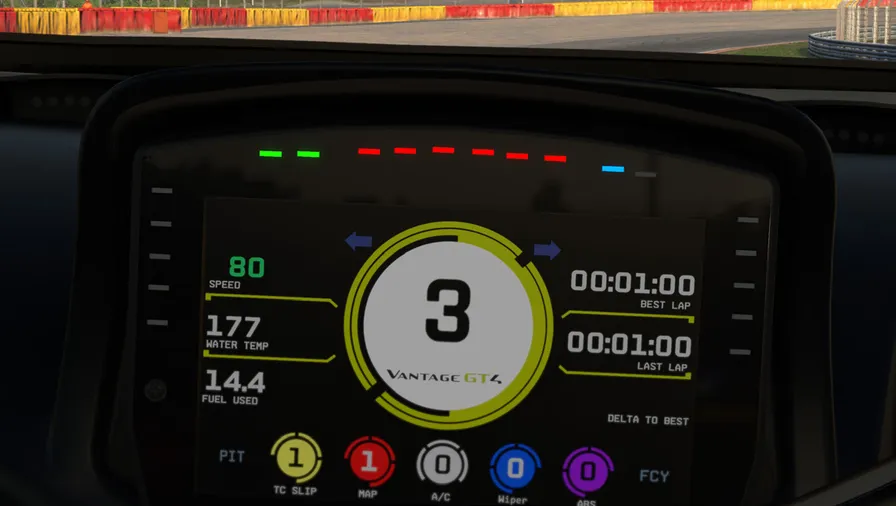
换挡提示灯从左向右依次亮起;当所有提示灯均呈蓝色闪烁时,车手应执行升挡。发动机转速超过最佳换挡点并接近转速限制器后,所有提示灯会开始闪烁红色。
The shift lights illuminate from the left to right, indicating the driver should upshift when all are flashing blue. Once the RPM has passed the optimum shift point and is approaching the rev limiter, all lights will begin flashing red.
牵引力控制TRACTION CONTROL
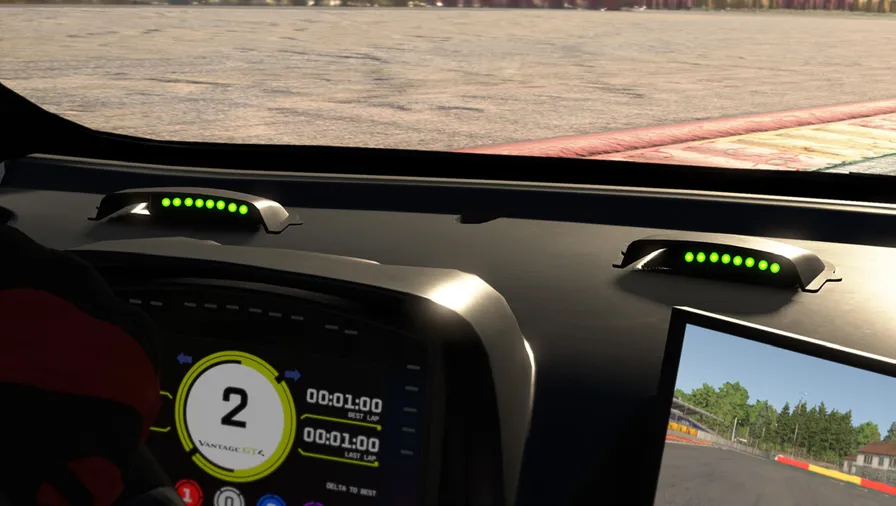
牵引力控制系统介入时,安装在仪表台顶部灯组中的所有提示灯都会闪烁绿色。
When traction control is active, all lights in the clusters affixed to the top of the dashboard will flash in green.
高级设置选项ADVANCED SETUP OPTIONS
本节面向希望深入了解车辆各项设置的进阶用户。调整以下参数并非必要操作,而且可能显著改变车辆的操控特性。建议所有调整都采用小幅渐进的方式,每次仅更改一个变量,然后上赛道测试效果。
This section is aimed toward more advanced users who want to dive deeper into the different aspects of the vehicle’s setup. Making adjustments to the following parameters is not required and can lead to significant changes in the way a vehicle handles. It is recommended that any adjustments are made in an incremental fashion and only singular variables are adjusted before testing changes.
轮胎与空气动力学TIRES & AERO
轮胎数据TIRE DATA
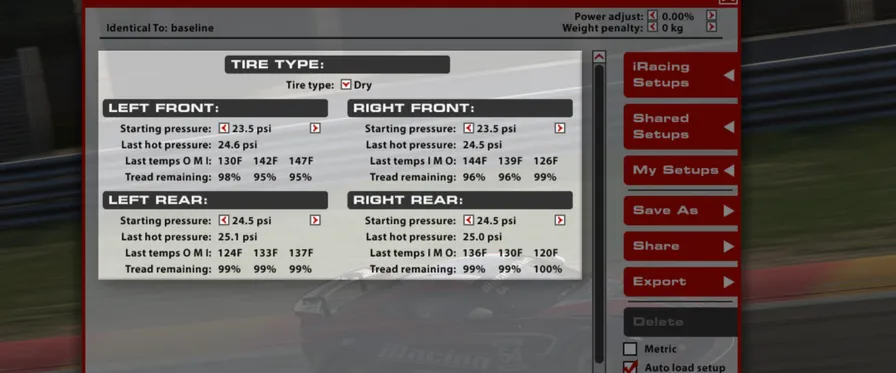
轮胎类型
选择车辆载入赛道时安装的轮胎类型。干地光头胎用于干燥比赛条件,湿地胎则用于降雨和湿滑赛道条件。
起始胎压
车辆载入赛道时的轮胎气压。较高胎压可降低滚动阻力和热量积聚,但会减少抓地力;较低胎压会增加滚动阻力和热量积聚,但可提高抓地力。车速和负荷较高时需要更高胎压,车速和负荷较低时则通常使用较低胎压表现更好。为获得最佳性能,应根据赛道特性设置冷态胎压。一般建议从较低胎压开始,再按需逐步提高。
上次热态胎压
车辆返回维修区后的轮胎气压。冷态与热态胎压之差可用于判断车辆在一个赛道驾驶阶段中的平衡变化;负荷较重的轮胎会产生更大的冷热胎压差。理想情况下,工作状态相近的轮胎应以相同速率增压,以免车辆的操控平衡随着轮胎使用时间而改变。因此,应调整冷态胎压,使同类轮胎达到工作温度后具有相近胎压。应在连续行驶若干圈、胎压趋于稳定后分析热态胎压。由于每次驾驶阶段的圈数会随赛道长度变化,可先在完整燃油驾驶里程约 50% 处进行分析。
轮胎温度
车辆返回维修区后的轮胎胎体温度,分别在胎面内侧、中部和外侧三个区域测量。单轮载荷和轮胎在赛道上的工作强度会反映在胎温中,可利用这些数值分析车辆的操控平衡。中央温度适合直接比较各条轮胎的工作强度;内侧与外侧温度则可用于分析车辆在赛道上的车轮定位状态,主要是外倾角。
剩余胎面厚度
车辆返回维修区后轮胎的剩余胎面厚度。轮胎磨损非常有助于识别车轮定位方面的潜在问题,例如轮胎一侧过度磨损;还可结合胎温分析车辆的操控平衡。其测量区域与胎温相同。
TIRE TYPE
Selects which type of tire is installed on the car when loaded into the world. Dry, or slick, tires are used for dry racing conditions while Wet tires are intended for raining and wet track conditions.
STARTING PRESSURE
Air pressure in the tire when the car is loaded into the world. Higher pressures will reduce rolling drag and heat buildup, but will decrease grip. Lower pressures will increase rolling drag and heat buildup, but will increase grip. Higher speeds and loads require higher pressures, while lower speeds and loads will see better performance from lower pressures. Cold pressures should be set to track characteristics for optimum performance. Generally speaking, it is advisable to start at lower pressures and work your way upwards as required.
LAST HOT PRESSURE
Air pressure in the tire after the car has returned to the pits. The difference between cold and hot pressures can be used to identify how the car is progressing through a run in terms of balance, with heavier-loaded tires seeing a larger difference between cold and hot pressures. Ideally, tires that are worked in a similar way should build pressure at the same rate to prevent a change in handling balance over the life of the tire, so cold pressures should be adjusted to ensure that similar tires are at similar pressures once up to operating temperature. Hot pressures should be analyzed once the tires have stabilized after a period of laps. As the number of laps per run will vary depending upon track length a good starting point is approximately 50% of a full fuel run.
TIRE TEMPERATURES
Tire carcass temperatures once the car has returned to the pits, measured in three zones across the tread of the tire: Inside, Middle and Outer.. Wheel Loads and the amount of work a tire is doing on-track are reflected in the tire’s temperature, and these values can be used to analyze the car’s handling balance. Middle temperatures are useful for directly comparing the work done by each tire, while the Inner and Outer temperatures are useful for analyzing the wheel alignment (predominantly camber) while on track.
TREAD REMAINING
The amount of tread remaining on the tire once the car has returned to the pits. Tire wear is very helpful in identifying any possible issues with alignment, such as one side of the tire wearing excessively, and can be used in conjunction with tire temperatures to analyze the car’s handling balance. These values are measured in the same zones as the temperatures.
底盘CHASSIS
前部FRONT
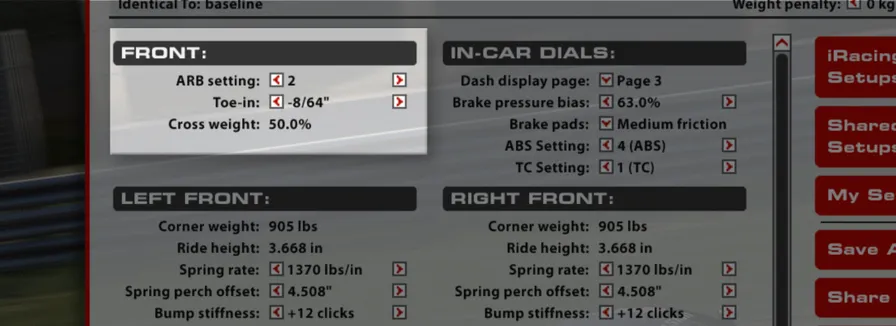
防倾杆设置
提高防倾杆设置会缩短防倾杆摆臂,提高前悬架侧倾刚度,从而减少车身侧倾,但增加机械转向不足。在某些情况下,这会让车手感到转向响应更加灵敏。相反,降低防倾杆设置会加长摆臂,使悬架在侧倾方向上更软,增加车身侧倾,但减少机械转向不足。这样可能使转向感觉不够灵敏,却能提高前轴抓地力。此外,还应考虑防倾杆软硬对空气动力学的影响:较软的防倾杆配置会增加车身侧倾,削弱高速弯中的空气动力学平台控制,并可能降低空气动力学效率。共有三个防倾杆设置,从 1(最软)至 3(最硬)。
前束
从上方观察时,前束角是车轮相对于底盘中心线的夹角。车轮前缘比后缘更靠近中心线称为正前束,反之则称为负前束。在前轴增加负前束会提高内侧轮胎的滑移并降低直线稳定性;增加正前束则会减少滑移并提高直线稳定性。
对角配重
车库中右前轮与左后轮载荷之和占车辆总重的百分比。对于非椭圆赛道,在其他底盘设置左右对称的前提下,50.0% 通常为最佳值,可使车辆在左右弯中呈现对称的操控特性。高于 50% 的对角配重会使车辆在左弯中更容易转向不足、在右弯中更容易转向过度。可通过调整各轮的弹簧座偏移来改变对角配重。
ARB SETTINGS
Increasing the ARB setting shortens the ARB arm and will increase the roll stiffness of the front suspension, resulting in less body roll but increasing mechanical understeer. This can, in some cases, lead to a more responsive steering feel for the driver. Conversely, reducing the ARB setting lengthens the ARB arm, softening the suspension in roll and increasing body roll but decreasing mechanical understeer. This can result in a less-responsive feel from the steering, but grip across the front axle will increase. Along with this, the effects of softening or stiffening the ARB assembly in relation to aerodynamics should also be considered, a softer ARB configuration will result in more body roll which will decrease control of the aero platform in high speed corners and potentially lead to a loss in aero efficiency. Three ARB settings are available ranging from 1 (softest) to 3 (stiffest).
TOE-IN
Toe is the angle of the wheel, when viewed from above, relative to the centerline of the chassis. Toe-in is when the front of the wheel is closer to the centerline than the rear of the wheel, and Toe-out is the opposite. On the front end, adding toe-out will increase slip in the inside tire and decrease straight-line stability while adding toe-in will reduce the slip and increase straight-line stability.
CROSS WEIGHT
The percentage of total vehicle weight in the garage acting across the right front and left rear corners. A setting of 50.0% is generally optimal for non-oval tracks as this will produce symmetrical handling in both left and right hand corners providing all other chassis settings are symmetrical. Higher than 50% cross weight will result in more understeer in left hand corners and increased oversteer in right hand corners. Cross weight can be adjusted by making changes to the spring perch offsets at each corner of the car.
车内旋钮IN-CAR DIALS
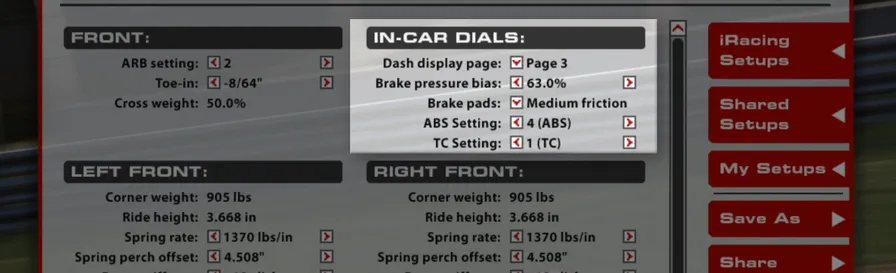
仪表显示页面
更改当前选择的数字仪表页面。本手册前述仪表配置章节介绍了三个可选页面。
制动力分配
制动力分配表示传递至前制动器的制动力百分比。数值高于 50% 时,前制动管路压力相对于后制动管路更高,制动平衡会向前移动,前轮更容易抱死,但车辆在制动区内可能更稳定。应结合车手偏好和赛道条件进行调整,以获得当前情境下的最佳制动表现。
制动片
可通过制动片配方改变车辆的制动表现。“低”设置摩擦力最低,会降低制动效能,但制动力最容易细腻调制;“中”和“高”设置提供更高摩擦力、增强制动效能,但制动力的可调制空间最小。
ABS 设置
车辆当前使用的 ABS 映射。共有十二个挡位:挡位 1 的干预/辅助最少,挡位 11 的辅助最多,挡位 0 则完全关闭 ABS。建议使用挡位 7 作为基准设置。提高干预可降低制动时发生抱死的概率并缩短抱死持续时间;但若相对于可用抓地力设置得过于激进,也可能延长制动距离。
牵引力控制设置
牵引力控制开关挡位决定 ECU 在后轮空转时削减发动机扭矩的积极程度。共有十二个挡位:设置 1–11 从最低干预/灵敏度(挡位 1)逐步增加至最高干预/灵敏度(挡位 11),挡位 0 则完全关闭牵引力控制。建议使用挡位 1 作为基准设置。提高干预可减少车轮空转和后胎磨损,但若牵引力控制过度削减发动机扭矩、抑制出弯加速,也可能降低整体性能。
DASH DISPLAY PAGE
Changes the currently selected digital dash page. Three options are available as previously described in the dash configuration section of this manual.
BRAKE PRESSURE BIAS
Brake Bias is the percentage of braking force that is being sent to the front brakes. Values above 50% result in greater pressure in the front brake line relative to the rear brake line which will shift the brake balance forwards increasing the tendency to lock up the front tyres but potentially increasing overall stability in braking zones. This should be tuned for both driver preference and track conditions to get the optimum braking performance for a given situation.
BRAKE PADS
The vehicle’s braking performance can be altered via the Brake Pad Compound. The “Low” setting provides the least friction, reducing the effectiveness of the brakes but allowing the most modulation, while “Medium” and “High” provide more friction and increase the effectiveness of the brakes but allow the least modulation.
ABS SETTING
The current ABS map the car is using. Twelve positions are available: Position 1 has the least intervention/support, position 11 has the most support, and position 0 disables the ABS completely. Position 7 is the recommended baseline setting. More intervention reduces the possibility of and the duration of lockups during braking but can result in longer braking distances if the system is set overly aggressive for the amount of available grip.
TRACTION CONTROL SETTING
The position of the traction control switch determines how aggressively the ECU cuts engine torque in reaction to rear wheel spin. Twelve positions are available: Settings 1-11 range from least intervention/sensitivity (position 1) to the highest intervention/ sensitivity (position 11) while position 0 disables the traction control completely. Position 1 is the recommended baseline setting. More intervention will result in less wheelspin and less rear tire wear but can reduce overall performance if the traction control is cutting engine torque too aggressively and stunting corner exit acceleration.
前轮设置FRONT CORNERS
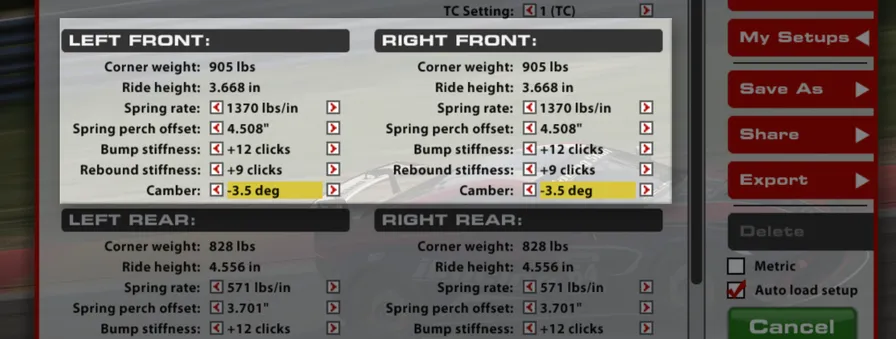
单轮载荷
车辆在车库中静止时,各车轮承受的载荷。合理分配各轮载荷,对于针对特定赛道和条件优化车辆至关重要。单轮载荷和对角配重均通过各轮的弹簧座偏移进行调整。
前车高
地面到底盘参考点的距离。由于数值是相对于车辆上的特定参考点测量,因此未必代表车辆的实际离地间隙,但可作为车辆静止时距赛道表面高度的可靠基准。调整车高是获得最佳性能的关键,因为车高会直接影响车辆的空气动力学性能和机械抓地力。提高前车高会减少前轴下压力和整车总下压力,但会允许过弯时前轴发生更多横向载荷转移。相反,降低前车高会增加前轴及整车总下压力,但会减少前轴横向载荷转移。
弹簧刚度
此设置决定各轮所安装弹簧的刚度。较硬的弹簧可缩小高、低负荷状态间的车高变化,并通过改善平台控制提高空气动力学性能;但弹簧过硬会加大轮胎负荷波动,导致机械抓地力下降。赛道越颠簸,硬弹簧的缺点通常越明显,此时使用较软弹簧反而能改善整体表现。各轮弹簧的变化会同时影响平台的侧倾和俯仰控制;调整各轮弹簧刚度时,还应考虑相应调整防倾杆,以保持原有的前后侧倾刚度分配和整体平衡。降低各轮弹簧刚度时,应提高防倾杆刚度,以维持之前的整体侧倾刚度。更改弹簧刚度后,必须调整弹簧座偏移,将车辆恢复至此前的静态车高。
弹簧座偏移
通过改变弹簧的安装位置来调整车辆该轮的车高。增大弹簧座偏移会降低该轮车高,减小弹簧座偏移则会抬高该轮车高。此类调整应在同一车轴左右对称进行,以确保左右车高一致且不改变对角配重。也可成对角线调整弹簧座偏移(左前与右后、右前与左后),以改变车辆的静态对角配重。
压缩刚度
压缩刚度设置会同时调整减振器的低速与高速压缩阻尼特性。对于 Vantage GT4,设置“0”是最小阻尼(压缩阻力最小),设置“25”是最大阻尼(压缩阻力最大)。提高压缩刚度会使制动、变向等瞬态动作中的载荷更快传递至车轮;对于前减振器,增加阻尼通常可提高初始转向响应,但会降低整体抓地力。高速压缩阻尼会随低速压缩阻尼同步增加,因此车辆碾过路肩时的冲击响应也会更生硬。在较平整的赛道上,较高压缩刚度通常有利于性能;在较颠簸或路肩激进的赛道上,降低压缩阻尼则可牺牲部分平台控制来换取更高的机械抓地力。
回弹刚度
回弹刚度设置会同时调整减振器的低速与高速回弹阻尼特性。提高回弹阻尼会减慢减振器在低速和高速工况下的伸长速度。典型低速工况是车辆在出弯时由侧倾状态恢复水平;高速工况则是悬架在大幅碾过路肩后伸长。设置“0”是最小阻尼(伸长阻力最小),设置“18”是最大阻尼(伸长阻力最大)。较高的回弹刚度可改善空气动力学平台控制和底盘整体响应,但应避免减振器回弹过慢,否则轮胎可能完全失去与赛道表面的接触,引发或加剧严重振荡。
外倾角
外倾角是车轮相对于底盘中心的垂直夹角。车轮顶部比底部更靠近底盘中心线称为负外倾,轮胎顶部比底部更向外则称为正外倾。受悬架几何和过弯负荷影响,四个车轮通常都需要负外倾。增大负外倾角的绝对值可提高轮胎产生的横向力,但会降低制动时的纵向抓地力。外倾角过大虽然可能产生很强的过弯力,也会显著缩短轮胎寿命,因此需要在耐久性与性能之间取得平衡。增加前轮负外倾通常会增强中高速过弯时的前轴抓地力,但会损失制动性能,因此需要将制动力分配相应后移作为补偿。
CORNER WEIGHT
The weight underneath each tire under static conditions in the garage. Correct weight arrangement around the car is crucial for optimizing a car for a given track and conditions. Individual wheel weight adjustments and crossweight adjustments are made via the spring perch offset adjustments at each corner.
FRONT RIDE HEIGHT
Distance from the ground to a reference point on the chassis. Since these values are measured to a specific reference point on the car these values may not necessarily reflect the vehicle’s ground clearance, but instead provide a reliable value for the height of the car off of the race track under static conditions. Adjusting Ride Heights is key for optimum performance, as they can directly influence the vehicle’s aerodynamic performance as well as mechanical grip. Increasing front ride height will decrease front downforce as well as decrease overall downforce, but will allow for more weight transfer across the front axle when cornering. Conversely, reducing ride height will increase front and overall downforce, but reduce the weight transfer across the front axle
SPRING RATE
This setting determines the installed corner spring stiffness. Stiffer springs will result in a smaller variance in ride height between high and low load cases and will produce superior aerodynamic performance through improved platform control. However overly stiff springs will result in increased tire load variation which will manifest as a loss in mechanical grip. Typically the drawbacks of stiffer springs will become more pronounced on rougher tracks and softer springs in these situations will result in increased overall performance. Corner spring changes will influence both roll and pitch control of the platform and ARB changes should be considered when altering corner spring stiffnesses in order to retain the same front to rear roll stiffness and overall balance. When reducing corner spring stiffness the ARB stiffness should be increased to retain the same roll stiffness as previously. Spring perch offsets must be adjusted to return the car to the prior static ride heights after any spring rate change.
SPRING PERCH OFFSET
Used to adjust the ride height at the corner of the car by changing the installed position of the spring. Increasing the spring perch offset will result in lowering the corner of the car while reducing the spring perch offset will raise the corner of the car. These changes should be kept symmetrical across the axle (left to right) to ensure the same corner ride heights and no change in cross weight. The spring perch offsets can also be used in diagonal pairs (LF to RR and RF to LR) to change the static cross weight in the car.
BUMP STIFFNESS
The bump stiffness setting is a paired adjustment controlling both the low and high speed compression damping characteristics of the damper. For the Vantage GT4, setting “0” is minimum damping (least resistance to compression) while “25” is maximum damping (most resistance to compression). Increasing the bump stiffness will result in faster weight transfer to the wheel during transient movements, such as braking and direction change, with increased damping usually providing an increase in turn-in response but a reduction in overall grip in the context of front dampers. High speed compression damping will increase proportionally to the increase in low speed compression damping which will also result in harsher response to kerb strikes. At smoother tracks more bump stiffness will typically increase performance while at rougher tracks or ones with aggressive kerbs less compression damping can result in an increase in mechanical grip at the expense of platform control.
REBOUND STIFFNESS
The Rebound Stiffness setting is a paired adjustment to both low and high speed rebound damping characteristics. Increasing rebound damping will slow down the rate at which the damper extends in both low and high speed situations. A typical low damper speed situation would be as the car rolls back to level on a corner exit while a high speed situation would be where the suspension is extending after large kerb contact. Setting “0” is minimum damping (least resistance to extension) while “18” is maximum damping (most resistance to extension). While high rebound stiffness will result in improved platform control for aerodynamic performance and overall chassis response it is important to avoid situations where the shock is too slow in rebounding as this will result in the tire losing complete contact with the track surface which can induce or exacerbate severe oscillations.
CAMBER
Camber is the vertical angle of the wheel relative to the center of the chassis. Negative camber is when the top of the wheel is closer to the chassis centerline than the bottom of the wheel, positive camber is when the top of the tire is farther out than the bottom. Due to suspension geometry and corner loads, negative camber is desired on all four wheels. Higher negative camber values will increase the cornering force generated by the tire, but will reduce the amount of longitudinal grip the tire will have under braking. Excessive camber values can produce very high cornering forces but will also significantly reduce tire life, so it is important to find a balance between life and performance. Increasing front camber values will typically result in increased front axle grip during mid to high speed cornering but will result in a loss of braking performance and necessitate a rearward shift in brake bias to compensate.
后轮设置REAR CORNERS
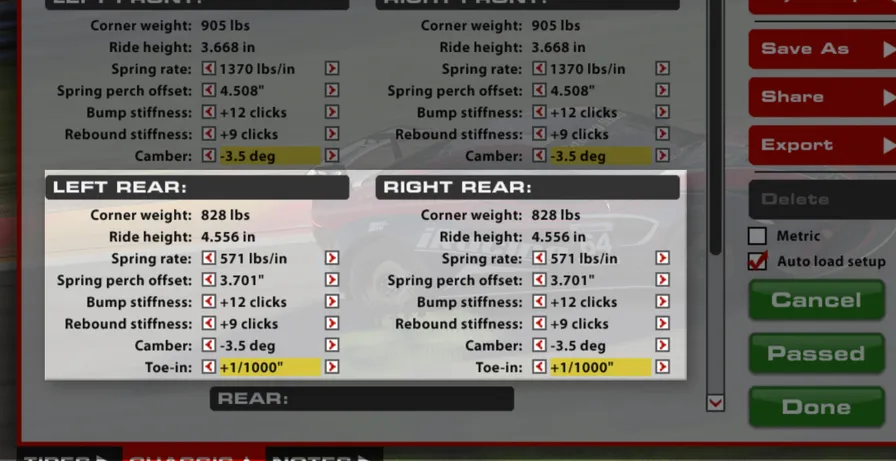
后车高
地面到底盘后部参考点的距离。提高后车高会减少后轴下压力、增加整车总下压力,并允许过弯时后轴发生更多横向载荷转移。相反,降低后车高会增加后轴下压力占比、减少整车总下压力,同时降低后轴横向载荷转移。后车高是兼顾机械平衡与空气动力学平衡的关键调校项;为获得最佳表现,应根据所选后轮弹簧匹配静态后车高。
弹簧刚度
与前轴相似,较硬的弹簧可缩小高、低负荷状态间的车高变化,通过改善平台控制提高空气动力学性能,但代价是机械抓地力降低。在低速弯大幅加油出弯时,这一影响可能尤其明显;硬弹簧在这类情境下反应较差,在颠簸赛道上尤甚,可能导致显著的牵引力损失。弹簧刚度应匹配赛道需求,并使车辆在高速与低速弯中的操控平衡保持一致。例如,一辆高速弯转向不足、低速弯转向过度的赛车,可能会受益于提高后弹簧刚度。这样既可使用较低的静态后车高,减少低速过弯时的后轴载荷转移,又能在高速过弯时维持甚至提高动态后车高,使空气动力学平衡前移并减轻转向不足。更改弹簧刚度后,必须调整弹簧座偏移,将车辆恢复至此前的静态车高。
压缩刚度
压缩刚度设置会同时调整减振器的低速与高速压缩阻尼特性,调节范围与前减振器相同。提高压缩阻尼会使加速、变向等瞬态动作中的载荷更快传递至车轮;对于后减振器,增加阻尼通常可提高响应,但会降低整体抓地力,尤其会损害出弯牵引力。在颠簸赛道上,压缩阻尼过硬可能导致轮胎负荷大幅波动并降低整体抓地力,从而严重损害牵引力。
回弹刚度
回弹刚度设置会同时调整减振器的低速与高速阻尼特性,调节范围与前减振器相同。提高回弹阻尼会减慢减振器在低速和高速工况下的伸长速度。较高的回弹刚度可改善空气动力学平台控制和底盘整体响应,但应避免减振器回弹过慢,否则轮胎可能完全失去与赛道表面的接触。此问题在制动和初始入弯阶段尤其不利;不过,提高回弹刚度也能在施加制动时“减缓”车辆俯仰姿态的变化,从而可能改善制动稳定性。
REAR RIDE HEIGHT
Distance from ground to a reference point on the rear of the chassis. Increasing rear ride height will decrease rear downforce as well as increase overall downforce and will allow for more weight transfer across the rear axle when cornering. Conversely, reducing ride height will increase rear downforce percentage but reduce overall downforce while reducing the weight transfer across the rear axle. Rear ride height is a critical tuning component for both mechanical and aerodynamic balance considerations and static rear ride heights should be considered and matched to the chosen rear corner springs for optimal performance.
SPRING RATE
Similar to the front axle, stiffer springs will result in a smaller variance in ride height between high and low load cases and will produce superior aerodynamic performance through improved platform control at the expense of mechanical grip. This can be particularly prominent when exiting slow speed corners with aggressive throttle application. Stiffer springs will tend to react poorly during these instances especially so on rough tracks which will result in significant traction loss. Spring stiffness should be matched to the needs of the racetrack and set such that the handling balance is consistent between high and low speed cornering. As an example case, a car which suffers from high speed understeer but low speed oversteer could benefit from an increase in rear spring stiffness. This will allow for a lower static rear height which will reduce rear weight transfer during slow speed cornering while maintaining or even increasing the rear ride height in high speed cornering to shift the aerodynamic balance forwards and reduce understeer. Spring perch offsets must be adjusted to return the car to the prior static ride heights after any spring rate change.
BUMP STIFFNESS
The bump stiffness setting is a paired adjustment controlling both the low and high speed compression damping characteristics of the damper with identical ranges to those of the front dampers. Increasing the compression damping will result in faster weight transfer to the wheel during transient movements, such as accelerating and direction change, with increased damping usually providing an increase in response but a reduction in overall grip especially at corner exit traction in the context of rear dampers. Excessively stiff compression damping can cause very poor traction on rough tracks as it can result in large tire load variation and a reduction in overall grip.
REBOUND STIFFNESS
The rebound stiffness setting is a paired adjustment controlling both the low and high speed damping characteristics of the damper with identical ranges to those of the front dampers. Increasing rebound damping will slow down the rate at which the damper extends in both low and high speed situations. High rebound stiffness will result in improved platform control for aerodynamic performance and overall chassis response but it is important to avoid situations where the shock is too slow in rebounding as this will result in the tire losing complete contact with the track surface. This can be particularly detrimental during braking events and during the initial turn-in phase though an increase in rebound stiffness can help to “slow down” the change in pitch of the car as the brakes are applied, potentially increasing braking stability.
后轮设置REAR CORNERS
外倾角
与前轮一样,为提高横向抓地能力,后轮也适合采用较大的负外倾角;不过,后轮负外倾通常会略小于前轮。主要有两个原因:其一,后轮比前轮更宽;其二,后轮还负责驱动车辆前进,因此外倾角对横向抓地力的增益需要与纵向牵引力的损失进行权衡。
正前束
从上方观察时,前束角是车轮相对于底盘中心线的夹角。车轮前缘比后缘更靠近中心线称为正前束,反之则称为负前束。后轴通常采用正前束。
增加正前束可改善直线稳定性,但会降低变向响应。应尽量避免使用过大的正前束,否则会增加滚动阻力、降低直线速度。调整后轮前束时要注意,后轴设置值针对单个车轮,而前轴设置值是左右轮的合计值。因此,把左右后轮的设置值相加后,后轴总前束变化量是前轴同一显示数值所代表变化量的两倍。通常建议保持左右前束值相等,避免车辆出现斜行或不对称操控;但在莱姆罗克公园这类左右弯严重不对称的赛道,采用不对称的后轮前束及其他设置参数可能有性能收益。
CAMBER
As with the front of the car it is desirable to run significant amounts of negative camber in order to increase the lateral grip capability; however, it is typical to run slightly reduced rear camber relative to the front. This is primarily for two reasons, firstly, the rear tires are wider compared to the fronts and secondly the rear tires must also perform the duty of driving the car forwards where benefits of camber to lateral grip become a tradeoff against reduced longitudinal (traction) performance.
TOE-IN
Toe is the angle of the wheel, when viewed from above, relative to the centerline of the chassis. Toe-in is when the front of the wheel is closer to the centerline than the rear of the wheel, and Toe-out is the opposite. At the rear of the car it is typical to run toe-in.
Increases in toe-in will result in improved straight line stability and a reduction in response during direction changes. Large values of toe-in should be avoided if possible as this will increase rolling drag and reduce straight line speeds. When making rear toe changes remember that the values are for each individual wheel as opposed to paired as at the front. This means that individual values on the rear wheels are twice as powerful as the combined adjustment at the front of the car when the rear toes are summed together. Generally, it is advised to keep the left and right toe values equal to prevent crabbing or asymmetric handling behavior; however, heavily asymmetric tracks such as Lime Rock Park may see a benefit in performance from running asymmetric configurations of rear toe and other setup parameters.
后部REAR

燃油量
油箱内的燃油量。
防倾杆设置
提高防倾杆总成刚度会增加后悬架侧倾刚度,从而减少车身侧倾,但增加机械转向过度。这也能让车辆在初始入弯时更快稳定至受力姿态。相反,降低防倾杆总成刚度会使悬架在侧倾方向上更软,增加车身侧倾,但减少机械转向过度。这样可能使车尾在瞬态动作中显得不够灵敏,却能提高后轴抓地力。共有三个防倾杆设置,从 1“软”至 3“硬”。
尾翼设置
尾翼设置是指尾翼的相对攻角。尾翼是重要的空气动力学装置,会显著影响车辆产生的总下压力(以及阻力),并随着角度增加使空气动力学平衡向后移动。增大尾翼角度可提高中高速弯的总体过弯抓地能力,但也会降低直线速度。调整尾翼角度时,应同时考虑前后车高,尤其是两者之差,即“前后车高差”。增大尾翼角度时,若要维持相同的整体空气动力学平衡,就需要增大车辆的前后车高差。
FUEL LEVEL
The amount of fuel in the fuel tank.
ARB SETTING
Increasing the ARB assembly stiffness will increase the roll stiffness of the rear suspension, resulting in less body roll but increasing mechanical oversteer. This can also cause the car to “take a set” more quickly at initial turn-in. Conversely, reducing the ARB assembly stiffness will soften the suspension in roll, increasing body roll but decreasing mechanical oversteer. This can result in a less-responsive feel from the rear especially in transient movements, but grip across the rear axle will increase. Three ARB settings are available ranging from 1 ‘soft’ to 3 ‘stiff’.
WING SETTING
The wing setting refers to the relative angle of attack of the rear wing, this is an aerodynamic device which has a significant impact upon the total downforce (and drag!) produced by the car as well as shifting the aerodynamic balance of the car rearwards with increasing angle. Increasing the rear wing angle results in more total cornering grip capability in medium to high speed corners but will also result in a reduction of straight line speed. Rear wing angle should be adjusted in conjunction with front and rear ride heights, specifically the difference between front and rear ride heights known as ‘rake’. To retain the same overall aerodynamic balance it is necessary to increase the rake of the car when increasing the rear wing angle.
调校提示SETUP TIPS
本节旨在帮助希望深入了解车辆各项设置的用户。
This section is aimed toward helping users who want to dive deeper into the different aspects of the vehicle’s setup.
调校提示SETUP TIPS
“iRacing 设置”文件夹中提供以下默认设置:
基准 — 50% 燃油量,首次载入车辆时使用的默认设置;操控特性刻意设得较为保守,便于熟悉新车或新赛道。
湿地基准 — 50% 燃油量,湿地赛道的默认设置;已安装湿地胎,并针对湿地条件调整车手辅助系统。
耐力 — 100% 燃油量,适用于大多数最佳尾翼角度在 3–5 范围内、比赛时长达到或超过一小时的赛道。
低下压力耐力 — 100% 燃油量,适用于代托纳、勒芒等重视直线性能并需要低尾翼角度的赛道;燃油量按一小时或更长的比赛配置。
开放设置冲刺 — 56% 燃油量,适用于开放设置系列赛中的大多数赛道,最佳尾翼角度通常在 3–5 范围内。
低下压力开放设置冲刺 — 56% 燃油量,适用于开放设置系列赛中重视直线性能、最佳尾翼角度较低的赛道。
固定设置冲刺 — 50% 燃油量,适用于短距离冲刺赛,也是固定设置系列赛采用的设置。
In the iRacing Setup folder you will find several default setups to choose from:
Baseline - 50% fuel level, the default setup when first loading the car, intentionally conservative to allow you to acclimatize to a new car or track.
Baseline_wet - 50% fuel level, the default setup for a wet track with wet tires fitted and driver aids adjusted for wet conditions.
Endurance - 100% fuel level, intended for most tracks where optimal wing angles will be in the 3-5 range and race lengths are at, or over, one hour in length.
Endurance Low Downforce - 100% fuel level, intended for tracks where straight-line performance is a priority (Daytona, Le Mans, etc.) and a low wing angle is required. Fueled for race lengths at, or over, one hour in length.
Sprint_Open - 56% fuel level, intended for most tracks in the Open Setup series where optimal wing angles are in the 3-5 range.
Sprint_Open_Low_Downforce - 56% fuel level, intended for tracks in the Open Setup series where straight-line performance is a priority and optimal wing angles are low.
Sprint_Fixed - 50% fuel level, intended for short sprint races and the setup used for the Fixed Setup series.
底盘调整CHASSIS ADJUSTMENTS
如果希望自行调整,改变车辆平衡最简单的方法是调整防倾杆或尾翼设置:
| 设置项 | 影响 |
|---|---|
| 更硬的前防倾杆 | 更多转向不足 |
| 更硬的后防倾杆 | 更多转向过度 |
| 更低的尾翼设置 | 更多转向过度、更少下压力、更高直线速度 |
| 更高的尾翼设置 | 更多转向不足、更多下压力、更低直线速度 |
如果调整燃油量或其他设置后未能通过技术检查,很可能需要调整车高。可通过车辆前后两端的弹簧座偏移完成调整:右键单击(正向调整)会降低车高,左键单击(负向调整)会提高车高。
Should you choose to make your own adjustments the easiest way to change the balance of the car is through the Anti-Roll Bars or the Wing setting:
| Field | Description |
|---|---|
| Stiffer front ARB | More understeer |
| Stiffer rear ARB | More oversteer |
| Lower wing setting | More oversteer, less downforce, and higher straight-line speed. |
| Higher wing setting | More understeer, more downforce, and lower straight-line speed. |
In the event a setup fails tech inspection after fuel level or other changes it is likely the ride heights require adjustment. This is performed by using the Spring Perch Offset adjustments at either end of the car: Right-clicks (positive) will reduce the ride height, left-clicks (negative) will increase the ride height.