Dallara IR18
用户手册Dallara IR18
User Manual
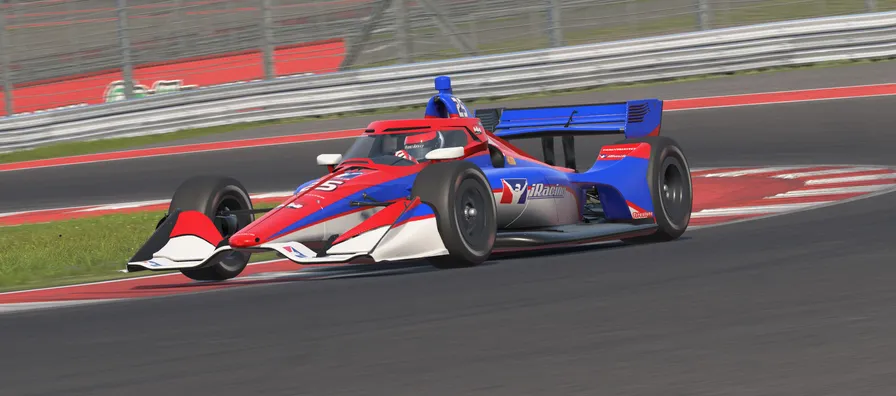
亲爱的 iRacing 用户:
恭喜您购买 Dallara IR18!iRacing 全体成员感谢您的支持以及对我们产品的认可。我们致力于提供极致的模拟赛车体验,也希望您驾驶新车时能在赛道上尽享激情!
本指南将说明如何充分发挥新车的性能,涵盖从赛道外的车辆设置调整,到驾驶时在座舱内看到的各种信息。希望本指南能帮助您快速上手。
再次感谢您的购买,我们赛道上见!
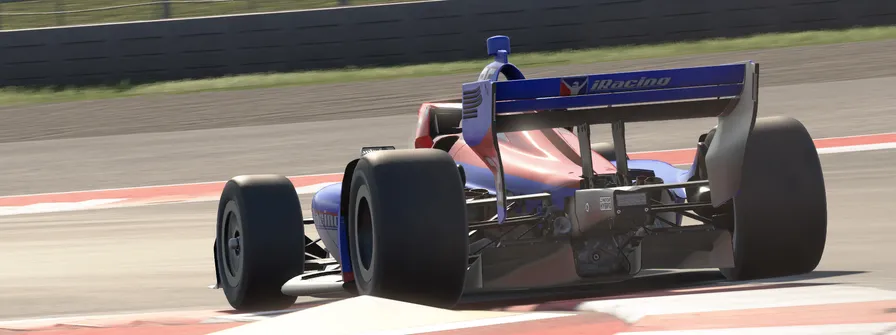
DEAR iRACING USER,
Congratulations on your purchase of the Dallara IR18! From all of us at iRacing, we appreciate your support and your commitment to our product. We aim to deliver the ultimate sim racing experience, and we hope that you’ll find plenty of excitement with us behind the wheel of your new car!
The following guide explains how to get the most out of your new car, from how to adjust its settings off of the track to what you’ll see inside of the cockpit while driving. We hope that you’ll find it useful in getting up to speed.
Thanks again for your purchase, and we’ll see you on the track!
技术规格TECH SPECS
底盘CHASSIS
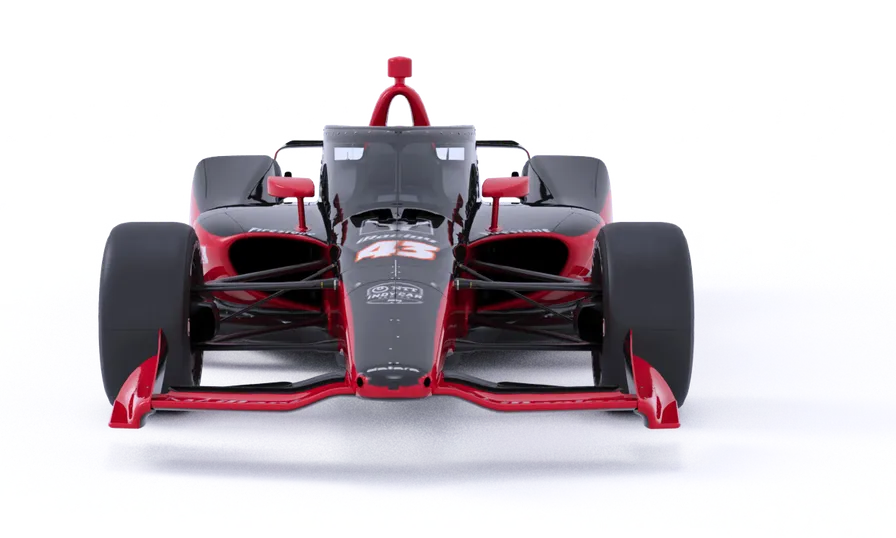
前后均采用带第三弹簧的双 A 臂推杆悬架
| 规格 | 数值 |
|---|---|
| 车长 | 5000 mm / 196.9 in |
| 车宽 | 2011 mm / 79 in |
| 轴距 | 3023-3073 mm / 119-121 in |
| 干重 | 845 kg / 1862 lbs |
| 含车手湿重 | 900 kg / 1984 lbs |
DOUBLE A-ARM PUSHROD WITH THIRD SPRING (FRONT AND REAR)
| Specification | Value |
|---|---|
| Length | 5000 mm / 196.9 in |
| Width | 2011 mm / 79 in |
| Wheelbase | 3023-3073 mm / 119-121 in |
| Dry Weight | 845 kg / 1862 lbs |
| Wet Weight with Driver | 900 kg / 1984 lbs |
动力单元POWER UNIT
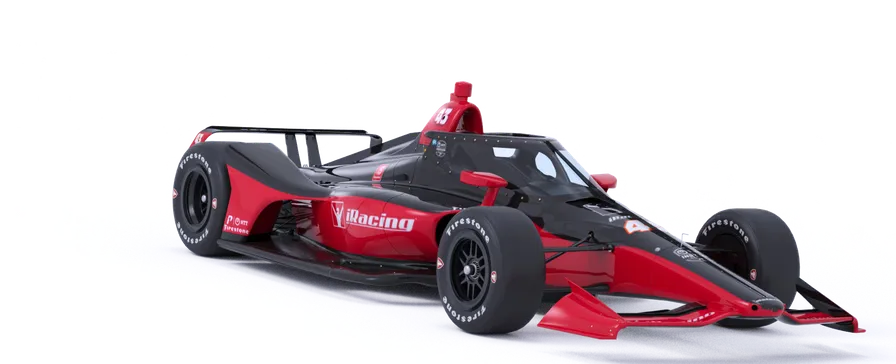
带 Push-to-Pass 的涡轮增压 V6
| 规格 | 数值 |
|---|---|
| 排量 | 2.2 Liters / 134.3 CID |
| 转速上限 | 12000 |
| 扭矩 | 300 lb-ft / 410 Nm |
| 功率 | 700 bhp / 522 kW |
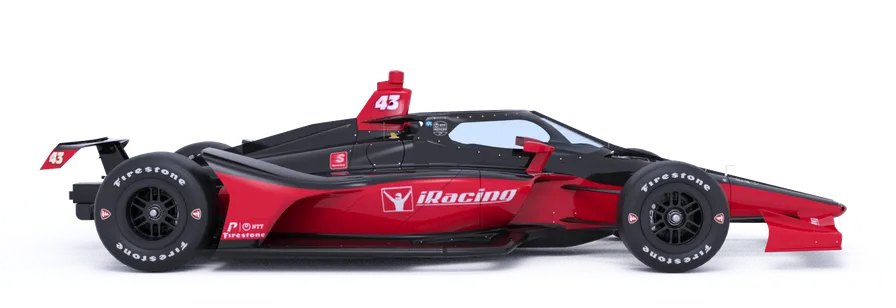
TURBOCHARGED V6 WITH PUSH-TO-PASS
| Specification | Value |
|---|---|
| Displacement | 2.2 Liters / 134.3 CID |
| RPM Limit | 12000 |
| Torque | 300 lb-ft / 410 Nm |
| Power | 700 bhp / 522 kW |
简介INTRODUCTION
本指南旨在帮助您深入理解车库中可用的底盘设置选项,以便按照个人偏好调校底盘。
不过,在深入调整底盘之前,最好先熟悉车辆和赛道。为此,我们为这些赛车经常使用的各条赛道提供了基准设置。
要载入基准设置,只需打开“车库”,单击“iRacing 设置”,然后为所选赛道选择合适的设置。如果某条赛道没有专用基准设置,可以选择特性相近赛道的设置作为起点。
选择合适的设置后,请驶上赛道并专注于跑出平顺且稳定的圈次,找准正确的赛车线,同时在连续多圈中观察轮胎磨损和操控趋势。
当您确信使用随车提供的基准设置已接近自身驾驶极限后,请继续阅读,开始按照个人操控偏好调校车辆。
The information found in this guide is intended to provide a deeper understanding of the chassis setup adjustments available in the garage, so that you may use the garage to tune the chassis setup to your preference.
Before diving into chassis adjustments, though, it is best to become familiar with the car and track. To that end, we have provided baseline setups for each track commonly raced by these cars.
To access the baseline setups, simply open the Garage, click iRacing Setups, and select the appropriate setup for your track of choice. If you are driving a track for which a dedicated baseline setup is not included, you may select a setup for a similar track to use as your baseline.
After you have selected an appropriate setup, get on track and focus on making smooth and consistent laps, identifying the proper racing line and experiencing tire wear and handling trends over a number of laps.
Once you are confident that you are nearing your driving potential with the included baseline setups, read on to begin tuning the car to your handling preferences.
快速上手GETTING STARTED
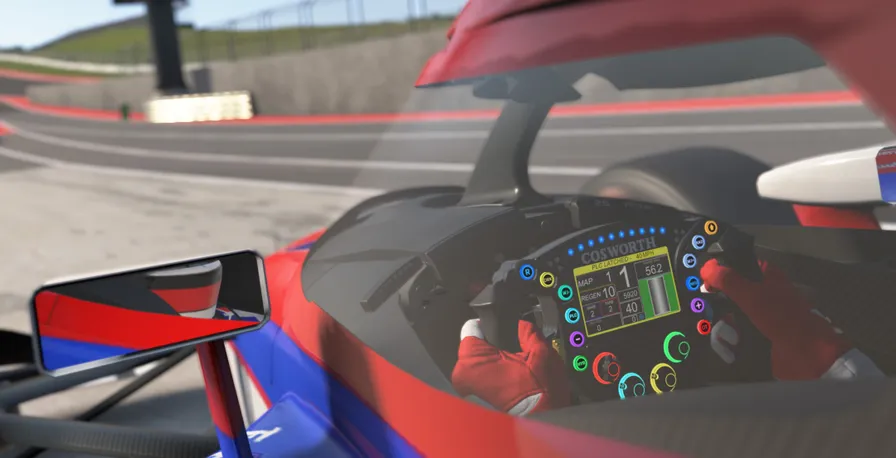
进入车辆后,只需按下“升挡”按钮挂入挡位,再踩下油门踏板即可起步。本车采用序列式变速箱,升挡或降挡均不需要踩离合器。不过,若降挡保护系统判断当前车速对于所选挡位过高、可能导致发动机损坏,就不会允许降挡;此时降挡指令会被直接忽略。
Once you load into the car, getting started is as easy as selecting the “upshift” button to put it into gear, and hitting the accelerator pedal. This car uses a sequential transmission and does not require a clutch input to shift in either direction. However the car’s downshift protection will not allow you to downshift if it feels you are traveling too fast for the gear selected and would incur engine damage. If that is the case, the gear change command will simply be ignored.
载入 iRacing 设置LOADING AN iRACING SETUP
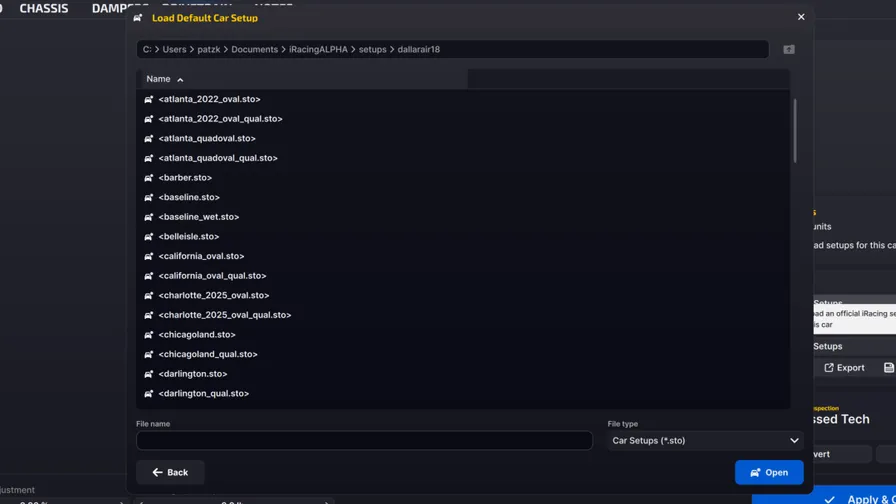
进入比赛会话后,车辆会自动载入 iRacing 基准设置 [baseline.sto]。如果您希望使用 iRacing 针对不同条件预制的其他设置,可以依次单击“车库 > iRacing 设置 >”,再选择符合需求的设置。
如需自定义设置,只需在车库中完成所需修改,然后单击“应用”。
若要保存设置供日后使用,请单击右侧的“另存为”,为修改后的设置命名并保存。要查看所有个人设置,请单击车库右侧的“我的设置”。
如需与另一位车手或会话中的所有人共享设置,可以单击车库右侧的“共享”。如果其他车手正在与您共享设置,也可以在车库右侧的“共享设置”中找到该设置。
Upon loading into a session, the car will automatically load the iRacing Baseline setup [baseline.sto]. If you would prefer one of iRacing’s pre-built setups that suit various conditions, you may load it by clicking Garage > iRacing Setups > and then selecting the setup to suit your needs.
If you would like to customize the setup, simply make the changes in the garage that you would like to update and click apply.
If you would like to save your setup for future use click “Save As” on the right to name and save the changes. To access all of your personally saved setups, click “My Setups” on the right side of the garage.
If you would like to share a setup with another driver or everyone in a session, you can select “Share” on the right side of the garage to do so.
If a driver is trying to share a setup with you, you will find it under “Shared Setups” on the right side of the garage as well.
仪表配置DASH CONFIGURATION
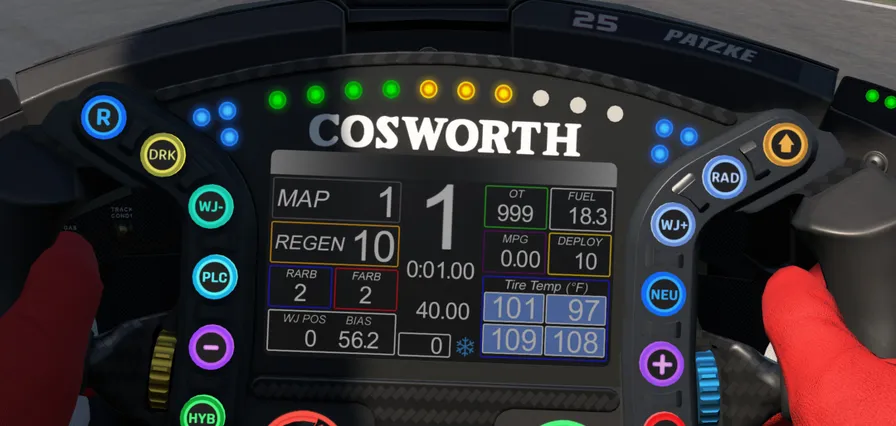
| 左侧区域 | 含义 |
|---|---|
| MAP | 当前发动机映射设置 |
| REGEN | 当前能量回收等级 |
| RARB | 后防倾杆设置 |
| FARB | 前防倾杆设置 |
| WJ POS | Weight Jacker 设置 |
| BIAS | 当前制动力分配设置 |
| 中央区域 | 含义 |
|---|---|
| 挡位指示 | 显示中央的大号数字为当前所选挡位 |
| 圈速 | 上一圈完成时间 |
| 时间差 | 当前圈与本节最佳圈之间的差值 |
| 圈数计数器 | 本节已完成的圈数 |
| 右侧区域 | 含义 |
|---|---|
| OT | Push-to-Pass 剩余时间(秒) |
| Fuel | 剩余燃油(加仑) |
| MPG/LPL | 当前油耗计算值:英里/加仑或升/圈 |
| DEPLOY | 当前能量释放等级 |
| Tire Temp | 实时轮胎温度(°F 或 °C) |
| Left Cluster | Value |
|---|---|
| MAP | Current engine map setting |
| REGEN | Current Regen level |
| RARB | Rear ARB setting |
| FARB | Front ARB setting |
| WJ POS | Weight Jacker setting |
| BIAS | Current Brake Bias setting |
| Middle | Value |
|---|---|
| Gear Indicator | The large number in the center of the display is the currently selected gear |
| Laptime | Previously completed lap time |
| Delta | Difference between the current lap and the session best lap |
| Lap Counter | Number of laps completed in the session |
| Right Cluster | Value |
|---|---|
| OT | Push To Pass time remaining in seconds |
| Fuel | Fuel remaining in Gallons |
| MPG/LPL | Current fuel economy calculation in Miles Per Gallon or Liters Per Lap |
| DEPLOY | Current Deploy level |
| Tire Temp | Live tire temperatures in °F or °C |
维修区限速器PIT LIMITER
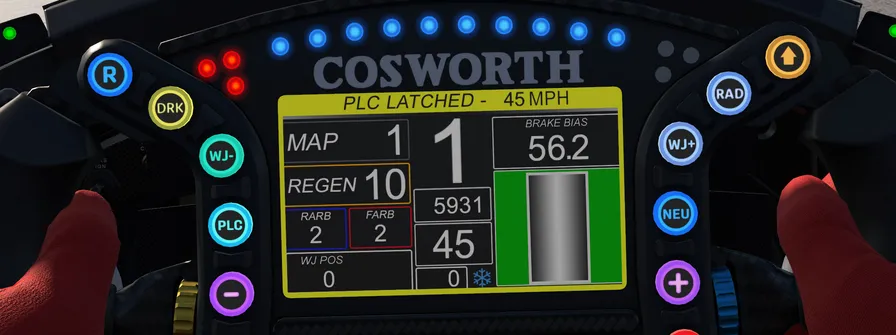
维修区限速器启用时,所有换挡灯会呈蓝色闪烁,显示屏出现黄色边框。右下角制动力分配显示下方会出现一个颜色编码方框:绿色表示低于维修区限速,黄色表示处于限速值,红色表示超速。
When the Pit Limiter is active all of the shift lights will flash in blue and the display will have a yellow border. A color-coded box in the lower right will appear under a brake bias display, with Green indicating a speed below pit limit, yellow being at the pit limit, and red indicates speeding.
Push-to-PassPUSH-TO-PASS
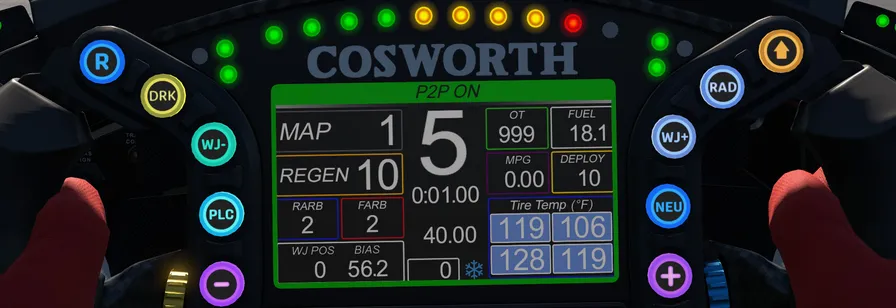
Push-to-Pass 启用时,内侧两组状态 LED 会亮起绿色,显示屏出现绿色边框。
When Push-to-Pass is active, the inner pairs of status LEDs will illuminate in green and the display will have a green border.
换挡灯与警示灯SHIFT LIGHTS

换挡灯
显示屏上方最顶排 LED 是与发动机转速联动的换挡灯。转速接近上限时,灯光会从左至右依次亮起,颜色由绿色变为黄色,再变为红色。十盏灯全部亮起后,若转速继续升高,灯光会变为蓝色并开始闪烁,提示需要升挡。
警示灯
若进入黄旗阶段,主显示屏两侧最右侧的三灯组会亮起黄色。
SHIFT LIGHTS
The uppermost row of LED lights above the display are shift lights linked to engine RPM. As RPM approaches the maximum, the lights will begin to illuminate left-to-right starting with green, then yellow, then red. Once all ten lights have illuminated and RPM climbs further, the lights will turn blue and begin flashing to signal an upshift is necessary.
CAUTION LIGHTS
If a Caution period begins, the right-side cluster of three LEDs on either side of the main display will illuminate in yellow.
混合动力状态灯HYBRID STATUS LIGHT
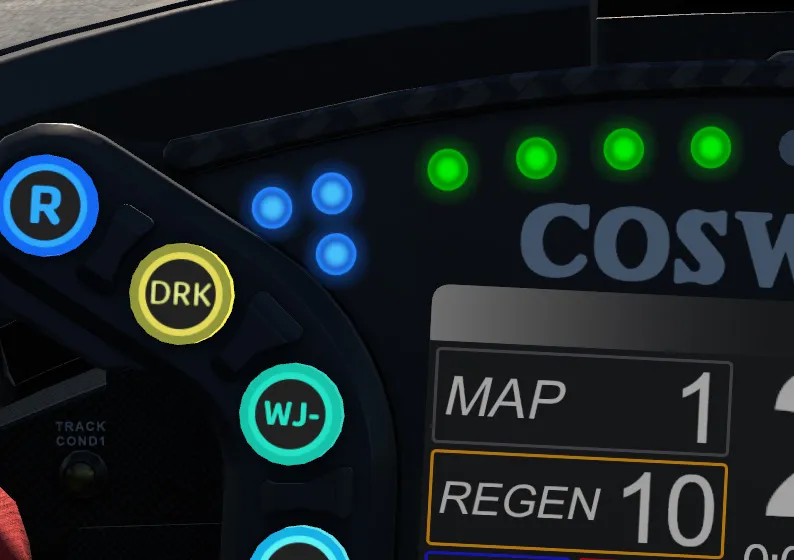
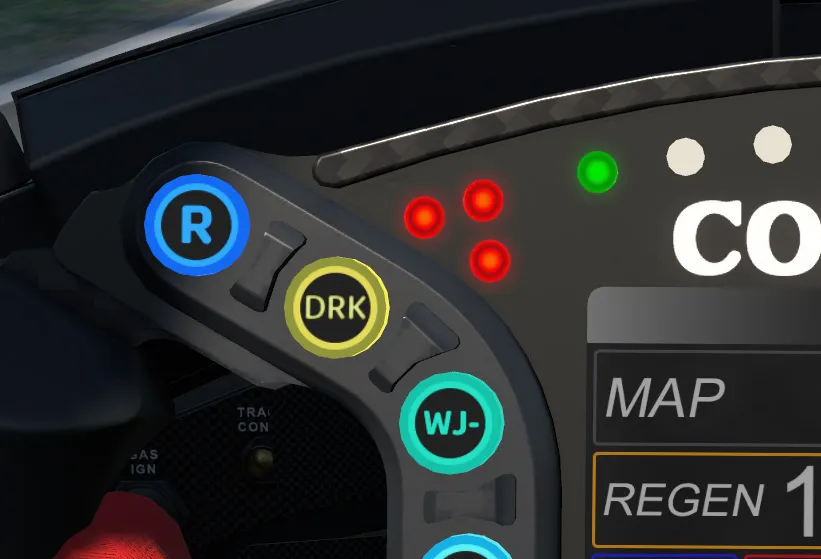
显示屏左侧的三灯 LED 组指示混合动力系统处于能量释放还是能量回收模式。在能量回收期间(减速回收或手动触发回收),灯光亮红色;能量释放期间则亮绿色。
A three-LED cluster on the left side of the display indicates whether the hybrid system is in Deploy or Regeneration mode. During Regeneration (either deceleration or manually-activated regen) the lights will illuminate in Red. During Deploy, the lights will illuminate in Green.
混合动力荷电状态HYBRID STATE OF CHARGE
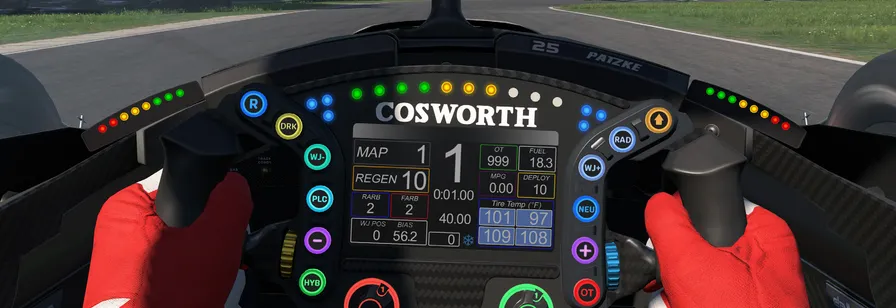
座舱两侧各有一组 LED,用于显示混合动力超级电容器当前的荷电状态。系统未释放能量时,LED 以红、黄、绿三色表示荷电状态。八盏灯全部亮起代表满电;随着电量消耗,灯光逐渐熄灭。能量回收期间继续使用这套配色。
系统释放能量时,灯光变为 7 盏蓝灯和 1 盏红灯,但仍然显示系统的荷电状态。
Two LED clusters on either side of the cockpit display the current State of Charge in the hybrid Supercapacitor. When the system is not deploying, the LEDs will be colored red, yellow, and green to indicate the state of charge. A full charge is all eight LEDs illuminated with lights extinguishing as charge is depleted. The lights will keep this color scheme during energy regeneration.
When the system is deploying energy, the lights will change to 7 blue and 1 red LED but still display the system’s State of Charge.
高级设置选项ADVANCED SETUP OPTIONS
本节面向希望深入研究车辆各项设置的高级用户。无需调整以下参数即可使用车辆,而调整它们可能显著改变车辆操控。建议每次只小幅调整一个变量,并在继续修改前测试其效果。
This section is aimed toward more advanced users who want to dive deeper into the different aspects of the vehicle’s setup. Making adjustments to the following parameters is not required and can lead to significant changes in the way a vehicle handles. It is recommended that any adjustments are made in an incremental fashion and only singular variables are adjusted before testing changes.
轮胎与空气动力学TIRES & AERO
轮胎数据TIRE DATA
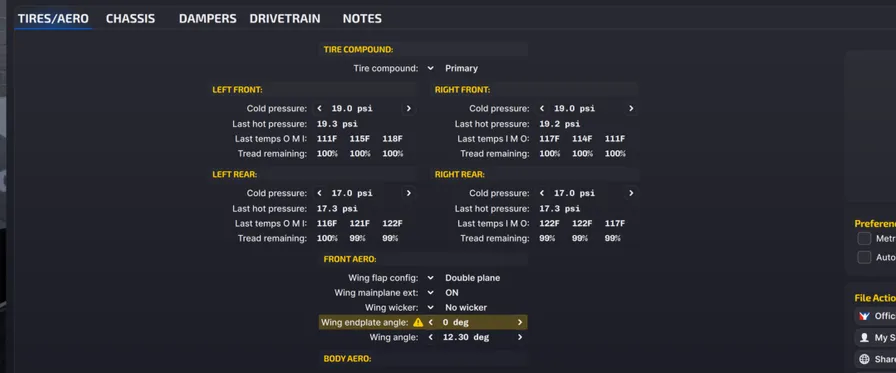
轮胎配方
在公路赛道上,IR18 可使用两种轮胎配方。Primary 硬胎抓地力较低,但寿命更长;Alternate 软胎抓地力更强,但寿命更短。椭圆赛道不提供此选项。
冷态胎压
车辆载入赛道时的轮胎气压。较高胎压会降低滚动阻力和热量积聚,但也会降低抓地力;较低胎压会增加滚动阻力和热量积聚,但能提高抓地力。更高的车速和载荷需要更高胎压,而在较低车速和载荷下,较低胎压通常表现更好。最低胎压会随赛道类型变化;椭圆赛道右侧轮胎的最低胎压通常高于左侧轮胎。
上次热态胎压
车辆返回维修区后的轮胎气压。冷、热胎压之差可用于判断一段连续行驶中车辆平衡的演变,承受更大载荷的轮胎通常会有更大的冷、热胎压差。理想情况下,工作方式相似的轮胎应以相同速率升压,以避免轮胎寿命周期中操控平衡发生变化。因此,应调整冷态胎压,确保同类轮胎达到工作温度后的胎压接近。比赛中应密切关注热态胎压,以充分发挥轮胎性能。
上次温度 O M I
车库中测得的是轮胎胎体温度,即胎面橡胶内部的温度。车轮载荷与轮胎在赛道上的工作量会反映在轮胎温度中,可用这些数值分析车辆操控平衡。中央温度适合直接比较各轮胎的工作量;内侧和外侧温度则适合分析车轮定位与赛道行驶中的轮胎气压。
剩余胎面
车辆返回维修区后轮胎剩余的胎面量。轮胎磨损有助于发现定位问题,例如轮胎一侧过度磨损;但在分析操控平衡时,磨损数据不应优先于轮胎温度。
TIRE COMPOUND
For road courses the IR18 allows one of two tire compounds to be used. The Primary compound is harder, providing less grip but longer tire life, while the Alternate compound is softer, providing more grip but shorter tire life. This option is not allowed on ovals.
COLD PRESSURE
Air pressure in the tire when the car is loaded into the world. Higher pressures will reduce rolling drag and heat buildup, but will decrease grip. Lower pressures will increase rolling drag and heat buildup, but will increase grip. Higher speeds and loads will require higher pressures, while lower speeds and loads will see better performance from lower pressures. Minimum pressures will change based on track type, with ovals typically having a higher right-side minimum tire pressure than the left-side tires.
LAST HOT PRESSURE
Air pressure in the tire after the car has returned to the pits. The difference between Cold and Hot pressures can be used to identify how the car is progressing through a run in terms of balance, with heavier-loaded tires seeing a larger difference between Cold and Hot pressures. Ideally, tires that are worked in a similar way should build pressure at the same rate to prevent a change in handling balance over the life of the tire, so Cold pressures should be adjusted to ensure that similar tires are at similar pressures once up to operating temperature. Careful attention should be paid to the Hot Pressures to extract the most performance out of the tires during a race.
LAST TEMPS O M I
The temperatures measured in the garage are tire carcass temperatures, measured within the tread rubber itself. Wheel Loads and the amount of work a tire is doing on the track is reflected in the tire’s temperature, and these values can be used to analyze the car’s handling balance. Center temperatures are useful for directly comparing the work done by each tire, while the Inner and Outer temperatures are useful for analyzing the wheel alignment and tire air pressure while on track.
TREAD REMAINING
The amount of tread remaining on the tire once the car has returned from the pits. Tire wear is very helpful in identifying any possible issues with alignment, such as one side of the tire wearing excessively, but should never be prioritized over tire temperatures when analyzing handling balance.
前部空气动力学FRONT AERO
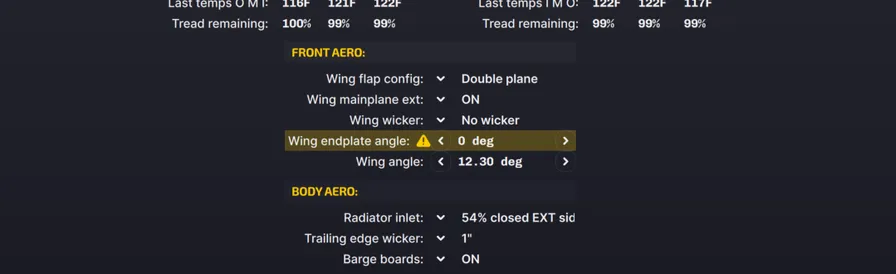
翼片配置
根据 IndyCar 规则,前翼上层翼片的数量由赛道类型决定:公路赛道使用两片上层翼片,椭圆赛道使用一片。
主翼面延伸件
主翼面延伸件会在前翼主翼面上增加小型部件,从而提高整个前翼组件产生的下压力。设为“ON”会增加前部下压力并略微增加阻力;设为“OFF”会使空气动力学平衡后移,并略微降低阻力。有关此功能的更多信息,请参阅“翼片扰流条”部分。
翼片扰流条
前翼最上层翼片后缘可以安装一条小型扰流条(或“Gurney Flap”)。可用选项取决于赛道:
- 公路赛道:允许在最上层前翼翼片上安装一条扰流条。
- 大型椭圆赛道、无主翼面延伸件:可在前翼后缘安装扰流条。“Step”数值表示扰流条覆盖前翼跨度的三分之几;例如 Step 2 覆盖 2/3 翼展,Step 3 覆盖整个翼展。
- 大型椭圆赛道、有主翼面延伸件:安装延伸件后不能选择 Step 2 或 3。不使用扰流条时,延伸件覆盖前翼内侧一半;选择 Step 1 时,会安装外侧延伸件和扰流条,形成全翼展主翼面延伸件,并在外侧一半设置小型扰流条。
- 短椭圆赛道:不允许使用扰流条。
翼端板角度
翼端板组件相对主翼面可在正负 3° 范围内旋转。更高的翼端板角度会增加下压力、使空气动力学平衡前移,同时改变可用的主翼面角度范围:更高的翼端板角度允许使用更高的主翼面角度(最低角度也更高),较低的翼端板角度则允许使用低得多的主翼面角度。公路赛道和短椭圆赛道不提供此选项。
翼面角度
翼面角度设置改变前翼主翼面相对水平面的角度。更高角度会增加前翼下压力、使空气动力学平衡前移并增加阻力;较低角度会降低下压力、使平衡后移并降低阻力。根据所选翼端板角度,可以使用负前翼角度。这些设置仍会产生一定下压力,但能为 Indianapolis 等高速椭圆赛道大幅降低阻力。
WING FLAP CONFIG
The number of front wing upper flaps is mandated per Indycar rules based on the track type. For Road Courses the wing will have two upper flaps and for Ovals the front wing will have one upper flap.
WING MAINPLANE EXT
The Wing Mainplane Extension adds small elements to the front wing’s mainplane to increase downforce generated by the wing assembly. Changing this setting to “ON” will increase Front downforce and slightly increase drag, while setting this to “OFF” will shift aero balance rearward and decrease drag slightly. See the “Wing Wicker” section for more information on this feature.
WING WICKER
A small wicker (or “Gurney Flap”) can be added to the trailing edge of the front wing upper-most flap. The options available for this setting are track dependent:
- Road Course - A single wicker on the uppermost front wing flap is allowed.
- Large Oval, no Wing Mainplane Extension - A wicker may be added to the front wing trailing edge. The wicker can be added in “Steps”, with each step indicating how many thirds of the front wing span has a wicker on it. For example, the Step 2 wicker will cover 2/3 of the front wing span, Step 3 will be a full-span wicker.
- Large Oval, Wing Mainplane Extension - If the Wing Mainplane Extension is installed, Steps 2 and 3 are not an option. If no wicker is chosen, the Wing Mainplane Extension will span the inner half of the front wing. If the Step 1 wicker is chosen, an outer extension and wicker will be installed, creating a full-span Mainplane Extension with a small wicker on the outer half.
- Short Oval - Wicker not allowed.
WING ENDPLATE ANGLE
The wing endplate assembly can be rotated relative to the wing mainplane up to 3° positive or negative. Higher Wing Endplate Angles will increase downforce and shift aero forward, but also change what Wing Mainplane angles are available. Higher Endplate Angles will allow for higher Wing Mainplane angles (but also a higher minimum angle) while lower Endplate Angles will allow for much lower Mainplane angles. This option is not available for Road Courses and Short Ovals.
WING ANGLE
The Wing Angle setting changes the angle of the front wing’s mainplane relative to horizontal. Higher angles will increase the downforce generated at the front wing, shift aero forward, and increase drag, while lower angles will decrease downforce, shift aero rearward, and reduce drag. Depending on the chosen Wing Endplate Angle, it is possible to run negative front wing angles. These settings still produce some downforce, but greatly reduce drag for high-speed ovals such as Indianapolis.
车身空气动力学BODY AERO

散热器进气口
两侧侧箱进气口均可部分封闭,以在需要时降低阻力。减小开口尺寸(车库设置中的“closed”百分比更高)会降低阻力并略微减少下压力,但因冷却能力下降而提高发动机温度。“77% Closed”选项仅在排位赛中可用,正赛不可使用。
后缘扰流条
公路赛道和短椭圆赛道可在后扩散器上缘安装 1 in 高的扰流条,以增加下压力并使空气动力学平衡后移,但阻力也会增加。大型椭圆赛道不提供此选项。
扩散器
后扩散器组件可通过三个选项定制:
侧壁:扩散器最外侧壁可安装、拆除或裁短,以改变扩散器产生的总下压力与阻力。拆除侧壁会降低阻力,但也会大幅减少下压力。“Trimmed”表示部分拆除侧壁,其下压力高于“OFF”、低于“ON”。
导流片:扩散器内部可安装垂直导流片,以提高扩散器效率和下压力。安装后下压力与阻力都会增加。第三个选项“Z+15”会在扩散器导流片底部增加 15 mm 延伸段,进一步提高下压力。
在大型椭圆赛道上,扩散器选项由规则强制规定,侧壁和导流片均须关闭。
RADIATOR INLET
Both sidepod inlets can be blocked off partially to decrease drag when desired. Decreasing the opening size (More “closed” percentage in the garage setting) will reduce drag with a slight reduction in downforce, but will increase engine temperatures due to reduced cooling. The 77% Closed option is only available for Qualifying sessions and is not allowed for Race sessions.
TRAILING EDGE WICKER
A 1” tall wicker can be installed on the upper edge of the rear diffuser at Road Courses and Short Ovals to increase downforce and shift aero rearward, but will increase drag. This option is not available for Large Ovals.
DIFFUSER
The rear diffuser assembly can be customized via three options:
Sidewalls - The outermost walls of the diffuser can be installed, removed, or trimmed to change the overall downforce and drag produced by the diffuser. Removing the sidewalls will reduce drag with a large reduction in downforce. “Trimmed” sidewalls are partially-removed sidewalls and provide more downforce than “OFF”, but less than “ON”.
Strakes - The diffuser can be fitted with internal vertical Strakes to increase the diffuser’s efficiency and downforce produced. Installing the diffuser strakes will increase downforce and drag. A third option, “Z+15” installs a 15mm extension to the bottom of the diffuser strakes to further increase downforce.
For Large Ovals the options for the diffuser are mandated so that both the Sidewalls and Strakes are off.
后部空气动力学REAR AERO
翼片配置
在公路赛道上,后翼可配置为一片或两片上层翼片。双翼面配置会产生大量下压力并使空气动力学平衡后移,代价是高阻力;单翼面配置会大幅降低下压力和阻力,同时使平衡前移。椭圆赛道仅可使用单翼面。
翼面角度
后翼角度设置控制后翼最上层翼片的角度。更高角度会产生更多下压力与阻力,并使空气动力学平衡后移;较低角度会同时降低下压力和阻力,但使平衡前移。可用角度范围会随翼组件类型(公路/短椭圆或大型椭圆)以及翼片配置所选数量而变化。
翼片扰流条
多数赛道可在后翼安装后缘扰流条。它会增加下压力并使平衡后移,但也会增加阻力。可用规则取决于赛道:
- 公路赛道/短椭圆赛道:可不装扰流条,或使用全翼展 ⅜ in 扰流条。
- 大型椭圆赛道(Indianapolis 除外):不允许后翼扰流条。
- Indianapolis Motor Speedway 椭圆赛道:可安装 ⅜ in 高、宽度为 13.2 in、24.5 in 或全翼展的扰流条。扰流条以翼面中心线为中心向两侧等距延伸;也可拆除,例如排位赛采用极低阻力配置时。
WING FLAP CONFIG
For Road Courses, the rear wing can be configured with one or two upper flaps. The Double Plane configuration will generate a significant amount of downforce and shift aero rearward at the cost of high drag, while the Single Plane option will greatly reduce both downforce and drag but shift aero forward. For ovals, only the Single Plane option is available.
WING ANGLE
The Rear Wing Angle setting controls the angle of the rear wing’s uppermost flap. Higher angles will produce more downforce, more drag, and shift aero rearward, while lower angles will reduce both downforce and drag but shift aero forward. Available wing angle ranges will change based on the wing assembly (Road Course/Short Oval or Large Oval) as well as the number of flaps chosen in the Flap Config setting.
WING WICKER
A trailing edge wicker may be installed on the rear wing for most tracks. This adds downforce and shifts aero rearward, but adds drag. The rules on what can be used are track-dependent:
- Road Course / Short Oval - Can be run without a wicker or with a full-span ⅜” wicker.
- Large Ovals (except Indianapolis) - Rear wing wicker is not allowed.
- Indianapolis Motor Speedway Oval - A wicker can be installed on the rear wing at Indianapolis that is ⅜” tall but has various widths of 13.2 inches, 24.5 inches, or a full-span wicker. This wicker is situated on the centerline of the wing and extends equally on either side of the centerline. This wicker can be removed as well, such as in Qualifying when opting for a very low-drag configuration.
空气动力学计算器AERO CALCULATOR
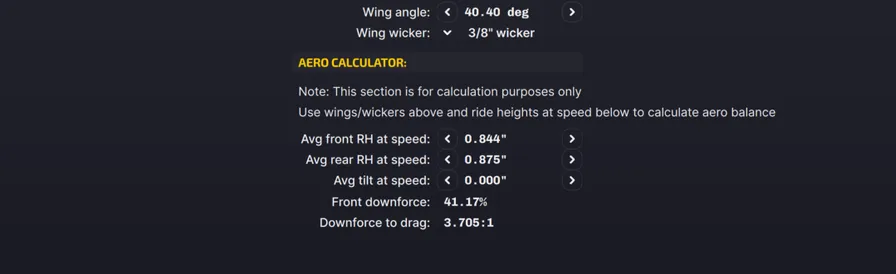
空气动力学计算器用于帮助理解调整后翼设置以及前后车高时引起的空气动力学平衡变化。需要特别注意:这里显示的前后车高数值不会对车辆本身造成任何机械改动,但在此修改后翼角度则会应用到车辆上。本计算器仅供参考。
高速时平均前/后车高
高速车高(RH)是计算器用于估算所选空气动力学套件性能的输入值。改变这些数值会改变计算器显示的前部下压力以及下压力/阻力比。检查赛道实际表现时,请使用遥测中的前车高传感器平均值(Front RH)与后车高传感器平均值(Rear RH)。也可以先改变这些数值,观察在实际调整车高或弹簧前,车身俯仰姿态会怎样影响空气动力学性能。
高速时平均侧倾
高速侧倾值表示底盘向左或向右滚转的程度。为获得最佳结果,请根据赛道遥测分别计算左侧车高平均值和右侧车高平均值;两者之差就是计算器中应使用的高速侧倾值。
空气动力学平衡
空气动力学平衡表示总下压力中作用于前轴的百分比。该数值由高速车高、侧倾值以及所选空气动力学选项计算得出。在底盘设置过程中应持续监控,避免出现意外结果。为防止底盘调整效果被空气动力学变化掩盖,每次空气动力学设置修改前后都应确认此数值保持一致。
下压力/阻力比
下压力/阻力比表示每单位阻力产生多少下压力。通常,比值越大,说明车辆空气动力学效率越高,能在给定阻力下产生较大下压力;较低比值通常出现在更顺滑、低阻力的空气动力学套件上。
The Aero Calculator is a tool provided to aid in understanding the shift in aerodynamic balance associated with adjustment of the rear wing setting and front and rear ride heights. It is important to note that the values for front and rear ride height displayed here DO NOT result in any mechanical changes to the car itself, however, changes to the rear wing angle here WILL be applied to the car. This calculator is a reference tool ONLY.
AVG FRONT / REAR RH AT SPEED
The Ride Height (RH) at Speed settings are inputs for the aero calculator to determine the approximate aero performance with the chosen aero package. Changing these values changes the displayed Front Downforce value as well as the Downforce-to-Drag ratio in the calculator. To check on-track performance, use the average of the front ride height sensors (Front RH) and the average of the rear ride height sensors (Rear RH) from telemetry. These can also be changed to observe how rake will affect aerodynamic performance prior to ride height or spring changes.
AVG TILT AT SPEED
The Tilt at Speed setting is a value of how much the chassis is rolled left or right. For best results, calculate (from on-track telemetry data) an average of the left-side ride heights and an average of the right-side ride heights. The difference between these averages is the Tilt at Speed value to use in the calculator.
AERO BALANCE
Aero Balance represents the percentage of total downforce that is working on the front axle. This value is calculated with the At Speed ride height and tilt values, as well as the chosen aerodynamic options, and should be monitored during the chassis setup process to prevent unexpected results. To ensure chassis adjustments don’t become masked by aerodynamic changes, always refer to this value to ensure it remains constant before and after aerodynamic setup changes.
DOWNFORCE TO DRAG
The Downforce to Drag ratio is a relation of how much downforce is produced for one unit of drag. Generally, a larger Downforce to Drag ratio would imply the car is working efficiently and producing large amounts of downforce for given drag numbers, while a lower Downforce to Drag value is typically seen on more slippery, low-drag aerodynamic packages.
底盘CHASSIS
常规GENERAL
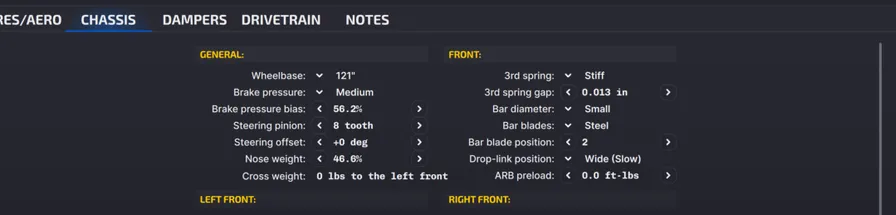
轴距
某些赛道配置允许调整整车轴距,以改变车辆的操控特性和响应速度。在大型椭圆赛道和 Indianapolis,轴距可设为 121 或 119 in。较长轴距让车辆方向稳定性更高、响应更慢,但对空气动力学平衡与纵向重量转移不那么敏感;较短轴距响应更快,适合较紧的弯道,但对前后空气动力学及重量转移更敏感。公路赛道与短椭圆赛道只能使用 121 in。
制动压力
如果整体下压力增加或降低,可能需要相应调整总体制动压力。通常,更高下压力允许使用更高制动压力而不锁死车轮;下压力较低时则需要降低制动压力。
制动力分配
制动力分配决定总制动管路压力中送往前轮的比例。数值越高,前轮制动力越大,通常会在制动时带来转向不足;降低比例会使制动力后移,并导致制动时转向过度。分配过于靠前或靠后都可能在重刹时锁死车轮,因此应设置为能在重刹时避免任一车轴锁死的数值。
转向齿条小齿轮
为适应不同车手偏好,可以更换 Steering Pinion,改变转向响应速度。小齿轮齿数越多,转向响应越快,较小的输入就可能使车辆显得更敏感;齿数较少会减慢转向,使其对输入不那么敏感。
转向偏移
椭圆赛道上的底盘常会采用非对称设置,使车辆向左偏转,车手需要保持一定反向转向来抵消。可根据需要调整转向偏移,使车辆直线行驶时方向盘居中。正值使方向盘顺时针偏置,负值则逆时针偏置。
前轴重量比例
Nose Weight 表示车辆总重量中位于前轴的百分比,主要用于平衡前后空气动力学分布。大多数情况下,将其设得高于空气动力学平衡百分比会使车辆方向更稳定。较低数值会使重量后移,带来转向过度并让车辆更容易改变方向;较高数值会提高方向稳定性,但过于靠前可能造成转向不足。
对角重量
Crossweight 是车辆总重量中位于右前轮与左后轮上的百分比。IR18 的读数表示前轴相对左前轮的重量差。例如显示“-100 (lbs or N) to the Left Front”,代表车库状态下右前轮比左前轮多 100 lb 或 N。更高的对角重量(左前读数更低或更负)会在左弯增加转向不足、在右弯增加转向过度;更低的对角重量(左前读数更高)则相反。
WHEELBASE
For some track configurations the overall wheelbase can be adjusted to change the car’s handling behavior and responsiveness. On Large Ovals and Indianapolis, the wheelbase can either be set to 121 or 119 inches. The longer option will result in a more directionally-stable car that is less responsive, but less sensitive to aero balance and longitudinal weight shifting. The shorter option will be more responsive, which is good for tighter corners, but will be more sensitive to fore-aft aero and weight shifting. For Road Courses and Short Ovals, the only option available is the 121 inch setting.
BRAKE PRESSURE
If overall downforce is increased or decreased, the overall braking pressure may need to be changed to suit. Generally, higher downforce levels can use higher braking pressures without wheel lockups, while lower downforce levels will need reduced brake pressures.
BRAKE PRESSURE BIAS
The Brake Pressure Bias setting determines how much of the overall brake line pressure is sent to the front wheels. Higher percentages apply more braking pressure to the front wheels which can induce understeer under braking, while reducing the percentage will shift braking force rearward and induce oversteer under braking. If the bias is set too far forward or rearward it can cause wheel lockups under heavy braking, so it should be set to a value that allows for heavy braking without lockups on either axle.
STEERING PINION
To fit various driver preferences, the Steering Pinion can be changed to alter how fast or responsive the steering is. Higher pinion teeth numbers will result in a faster steering response which can make the car feel more twitchy with small steering inputs, while lower pinion values will slow the steering and make it less responsive to inputs.
STEERING OFFSET
On oval tracks it’s not uncommon for the chassis to be set up asymmetrically, causing the car to pull to one side and the driver to hold some amount of opposite steering to counter it. If desired, the Steering Offset setting can be changed to center the steering wheel down the straights. Positive values will reposition the steering wheel in a clockwise direction, negative values will position the steering wheel in a counter-clockwise direction.
NOSE WEIGHT
Nose Weight is the percentage of the vehicle’s total weight that is situated on the front axle. This is used primarily to balance front-to-rear aero distribution, and in most cases will produce a directionally-stable car when set higher than the aero balance percentage. Less Nose Weight will shift weight rearward, inducing oversteer as well as helping the car change directions more easily. More Nose Weight will create a more directionally-stable chassis, but can induce understeer if set too far forward.
CROSSWEIGHT
Crossweight is the percentage of the car’s total weight situated over the Right-Front and Left-Rear wheels. For the IR18, this value is represented as a difference in weight across the front axle relative to the Left-Front wheel. For example, if the readout shows “-100 (lbs or N) to the Left Front”, the Right-Front wheel has 100 lbs or Newtons more than the Left-Front wheel when in the garage. Higher Cross Weight values (Lower or More Negative to the Left-Front) will induce understeer in left-hand corners and oversteer in right-hand corners. Lower Cross Weight values (Higher to the Left-Front) will induce oversteer in left-hand corners and understeer in right-hand corners.
前部FRONT
第三弹簧
公路赛道可在悬架中增加由聚合物限位胶构成的第三弹簧。它只在升沉方向(垂直悬架行程)工作,可用来防止车辆在高空气动力载荷或赛道起伏、倾斜弯等垂直作用力下下沉过多。这样便可使用较软的车轮弹簧(因为无需单独承担全部空气动力载荷),从而提高过弯时的机械抓地力。椭圆赛道不提供第三弹簧。
第三弹簧间隙
第三弹簧间隙是第三弹簧元件在限位胶接触前必须压缩的距离;间隙越大,接合前需要的垂直行程越多。聚合物限位胶的刚度会随压缩量增加:小压缩量时刚度较低,大压缩量时刚度很高。它可细调悬架在高速、高空气动力载荷下通过路面凸起时的表现,减少此类情况下的车轮载荷变化。
防倾杆直径
前防倾杆有大直径、小直径和拆除三种选项。大直径会提高前悬架侧倾刚度,降低机械抓地力并增加转向不足,但尽力让底盘过弯时保持平直。小直径降低侧倾刚度,提高前轴机械抓地力并减轻转向不足,但车身侧倾更大。拆除会大幅降低侧倾刚度,可显著增加前端机械抓地力并增加转向过度。拆除后,其他前防倾杆设置均不起作用。
杆片材质
前防倾杆杆片可选钢或钛(Ti)以改变总成刚度。钢制杆片更硬,会略微提高侧倾刚度并可能引起转向不足;钛制杆片更软,会略微降低侧倾刚度并减轻转向不足。此选项不会产生重量等其他底盘影响。
杆片位置
防倾杆杆片方向有六档,从最软(1)到最硬(6)。数值越高,防倾杆越硬;越低则越软。较硬设置增加转向不足,较软设置减轻转向不足。可通过 F8 黑框中的“ARB F”在车内调整。
连杆位置
防倾杆连杆有两个安装位置。“Wide (Slow)”减慢防倾杆受力速度,降低有效刚度并减轻转向不足;“Narrow (Fast)”加快受力速度,提高有效刚度并增加转向不足。
防倾杆预载
底盘调整经常会向防倾杆总成施加少量静态载荷。防倾杆预载可消除这些载荷,避免不对称表现。椭圆赛道也可用它向杆体施加静态载荷,以管理赛道倾角过渡中的对角重量变化。
3RD SPRING
For Road Courses a Third Spring element, in the form of a polymer bump stop, can be added to the suspension. This element works only in heave (vertical suspension travel) and can be set to prevent the car from dropping too far under heavy aerodynamic loads or vertical forces from track shape, such as dips or turn banking. Using the Third Spring in this way allows for softer corner springs to be used (since they won’t have to carry the full aerodynamic loads), increasing mechanical grip while cornering. The Third Spring is not available on Ovals.
3RD SPRING GAP
The Third Spring Gap is the distance the third spring element must compress before the third spring bump stop is engaged with higher gap values requiring more vertical travel before engagement. The Third Spring is a polymer bump stop and thus increases in rate as it is compressed, with low compression values having low spring rate and high compression values having a very high spring rate. This can be used to fine-tune the suspension’s behavior over bumps in the track surface at high speeds and high aerodynamic loads to help reduce changes in wheel load in these situations.
BAR DIAMETER
The front Anti-Roll Bar is available in three options: Large diameter, Small diameter, and None (ARB removed). The Large diameter option will stiffen the front suspension in roll, reducing mechanical grip and inducing understeer, but will try to keep the chassis flatter when cornering. The Small diameter option will reduce roll stiffness, increasing mechanical grip across the front axle and reducing understeer, but will allow the chassis to roll more. Removing the ARB will dramatically reduce roll stiffness but can provide a large increase in front end mechanical grip and increase oversteer. If the ARB is removed, all other front ARB settings have no effect on the chassis.
BAR BLADES
The front ARB bar blades can be made of either Steel or Titanium (Ti) to alter the stiffness of the ARB assembly. The Steel blades are stiffer, slightly increasing roll stiffness can induce understeer. The Titanium blades are softer and will slightly reduce roll stiffness, which can reduce understeer. This adjustment has no other effect on the chassis, such as one option being lighter than the other.
BAR BLADE POSITION
The ARB blade orientation can be changed to one of six options to alter the stiffness of the ARB assembly. Represented numerically from softest (1) to stiffest (6), higher values result in a stiffer ARB while lower values soften the ARB. Stiffer settings will induce understeer while softer settings will reduce understeer. This adjustment is available as an in-car adjustment in the F8 Black Box as “ARB F”.
DROP-LINK POSITION
The ARB drop-links can be mounted in one of two positions that will alter the ARB stiffness. The “Wide (Slow)” option will reduce how fast the ARB is loaded, reducing the effective stiffness of the ARB assembly and reducing understeer. Changing to the “Narrow (Fast)” option will speed up the ARB, increasing effective stiffness and increasing understeer.
ARB PRELOAD
Adjustments to the chassis will often result in small static loads being applied to the ARB assemblies. The ARB Preload setting can be used to remove these loads to prevent any asymmetric behavior from the ARB. On Ovals it can be used to apply a static load to the bar and manage crossweight changes in banking transitions.
前轮FRONT CORNERS
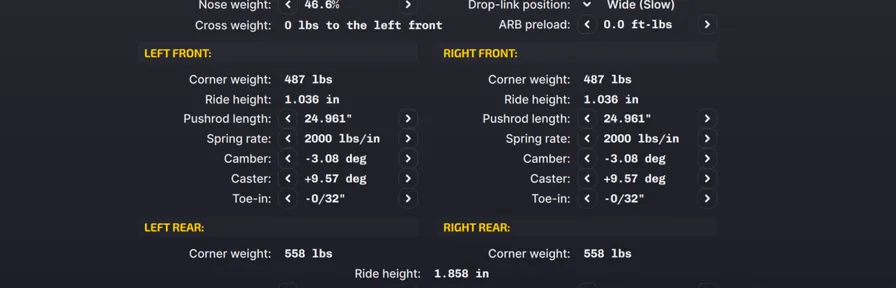
单轮重量
单轮重量表示车辆静置在车库中时各车轮承受的重量,可用于直观了解静态重量分布,并在设置过程中识别重量分布变化。
车高
前车高是从地面到投影于前轴中心位置的底盘参考点的距离。它不一定代表底盘最低点,因此不直接等于离地间隙,而是用于设置与空气动力学工作的参考值。车高应足够低,以兼顾空气动力学和机械抓地力,同时又要足够高,避免底盘在一圈中与赛道发生明显接触。升降前车高会影响空气动力学平衡、总下压力和阻力;修改时请查看空气动力学计算器。
推杆长度
可在前悬架推杆上增减垫片来改变长度,从而调整车高。这是非常精细的调整;尤其进行非对称调整时,应密切关注单轮重量与对角重量,确保调整推杆长度时不会改变重量分布。
弹簧刚度
弹簧刚度表示控制各车轮的悬架弹簧硬度,即将弹簧压缩特定距离所需的力(lb 或 N)。弹簧既用于防止底盘在载荷下触地,也用于控制底盘空气动力学姿态,同时会显著影响操控。前部较硬的弹簧可减少空气动力载荷增加时前翼的移动,但会降低机械抓地力,在慢弯造成转向不足;较软弹簧会带来更多前端运动,可能不利于空气动力学,却能提高前轴机械抓地力、减轻转向不足,极端时也可能造成转向过度。
外倾角
外倾角是车轮相对于底盘中心的垂直角度。负外倾表示车轮顶部比底部更靠近底盘中心线,正外倾则相反。更大的负外倾能在倾斜方向上提供更高过弯力(更积极的入弯响应),但角度过大可能降低制动能力。
IR18 同时用于椭圆与公路赛道,因此理想外倾设置会随赛道类型变化。公路赛道四轮均宜设为负外倾;椭圆赛道右侧轮胎应为负外倾,左侧轮胎应为正外倾。由于各轮承受的载荷不同,椭圆赛道外倾差值通常因赛道而异;一般而言,载荷较低的轮胎无法承受与高载荷轮胎同样大的外倾。
主销后倾角
主销后倾角是前悬架上下球头连线与垂直方向之间的角度,实质上代表前悬架转向轴。正后倾表示上球头比下球头更靠后;负后倾表示上球头更靠前,但 IR18 不允许负值。
增大后倾会提高轮胎气动拖距效应,增强方向稳定性并让方向盘手感更重,松开输入时更倾向自行回正;同时会增加悬架顶升效应,转向时把更多载荷移至内侧前轮,降低入弯时的对角重量并从机械上帮助车辆转向,但也会加大车身向外侧侧倾。该效果有利于慢弯,却可能在高速弯因空气动力学姿态变化而不利。减小后倾会产生相反效果。
椭圆赛道通常适合使用非对称后倾,左前正后倾小于右前。这会使底盘自然向左转,并降低入弯时的对角重量。不过,后倾增加也会略微提高轮胎滚动阻力,不利于极其重视极速的大型椭圆赛道。
前束
前束是俯视时车轮相对底盘中心线的角度。负前束表示轮胎前端比后端离中心线更远,正前束则表示前端更近。前束会改变过弯时前轮侧偏角:外八能改善入弯响应,但降低直线稳定性并增加轮胎温度和磨损。较低前束值可提高转向响应,却可能带来不稳定的转向感。椭圆赛道载荷高度不对称,因此左右前轮使用差异很大的前束值来管理受载侧偏角并不罕见。一般右前轮过弯载荷更高,可使用比左前轮更大的外八。
CORNER WEIGHT
Corner Weight represents the weight on each wheel when sitting in the garage. This can be used to visualize the weight distribution under static conditions and help with identifying changes to weight distribution through the setup process.
RIDE HEIGHT
Front Ride Height is a measurement from the ground to a reference point on the chassis projected to the center of the front axle. Since this value doesn’t necessarily represent the lowest point on the chassis it does not specifically represent the chassis’ ground clearance, but is instead a reference for setup and aero work. It is important to have the ride height low for both aero and mechanical grip, but high enough that the chassis doesn’t make significant contact with the race track over the course of a lap. Raising and lowering the front ride height will affect aerodynamic balance, overall downforce levels, and drag, so consult the Aero Calculator to see how a ride height change will influence handling when changing this value.
PUSHROD LENGTH
To adjust the Ride Height, shims can be added to or removed from the front suspension push rods to change their length. This is a very fine adjustment, however close attention should be paid to Corner Weights and Cross Weight, especially when making asymmetric adjustments, to ensure weight distribution isn’t altered while changing the Pushrod Length.
SPRING RATE
Spring Rate is the stiffness of the suspension’s corner springs controlling each wheel. The value is a representation of how much force (Pounds or Newtons) required to compress the spring a specific distance. Springs are used to keep the chassis from contacting the track under the loads seen on track and to manage the chassis’ aerodynamic attitude, but their stiffness also has a major influence on the car’s handling characteristics. On the front end, stiffer springs can keep the front wing from moving too much under increasing aerodynamic loads but will decrease mechanical grip and can cause understeer in slower corners. Softer springs will result in more front end movement, which can hurt aero, but will increase mechanical grip in the front axle and reduce understeer (or cause oversteer, in extreme cases).
CAMBER
Camber is the vertical angle of the wheel relative to the center of the chassis. Negative camber is when the top of the wheel is closer to the chassis centerline than the bottom of the wheel, positive camber is when the top of the tire is farther out than the bottom. Higher negative camber values will provide more cornering forces in the direction of the tire’s camber (more aggressive turn-in response), but may reduce braking capability at high camber angles.
Since the Dallara IR18 runs on both ovals and road courses, the desired camber settings will change between track types. For road courses it is best to have all four wheels set to negative camber values. For Ovals, the right-side tires should be set to negative camber values while the left-side tires should be set to positive values. The difference in camber values on ovals will often change from track to track due to varying levels of load seen on each tire. Generally, if a tire sees less load it will not be able to work with as much camber as a more heavily-loaded tire.
CASTER
Caster is the angle between vertical and a line drawn through the upper and lower ball-joints on the front suspension, essentially representing the steering axis of the front suspension. Positive caster indicates the upper ball joint is farther back than the lower ball joint, while negative caster would indicate the upper ball joint is ahead of the lower ball joint but this is not allowed on the IR18. Caster can have many effects that must be considered during the setup process.
Increasing caster will increase the pneumatic trail effect in the tire, which will impart directional stability and create a steering feel that seems “heavier” to the driver, with the steering wanting to straighten itself as steering input is released. It will also introduce suspension jacking forces as the angle is increased, causing more load to be shifted to the inside front wheel when the steering is turned. This decreases crossweight on turn-in and mechanically helps to turn the car in but this also increases how much the chassis rolls to the outside when steering is applied. This effect can be very helpful in slow corners, however in high-speed corners the aero effect caused by the chassis roll can be detrimental. Decreasing the caster will have the opposite effect for all conditions created by increasing the caster value.
For Ovals it will often be desirable to run asymmetric caster values, with the left-front wheel running a lower amount of positive caster than the right-front wheel. This results in a natural tendency for the chassis to steer to the left as well as decreasing crossweight on turn-in, which can be very beneficial for ovals. However, as caster increases there is a small increase in rolling drag on the tire, which can be detrimental for large ovals where top speed is crucial.
TOE-IN
Toe is the angle of the wheels relative to the chassis centerline when viewed from above. Negative toe-in sets the front of the tires farther from the centerline than the rear of the tires while positive toe-in sets the front of the tires closer to the centerline than the rear of the tires. This setting can change the front tire slip angle in a turn, with toe-out providing better turn-in response but less straight-line stability and increased tire temperature and wear. Lower toe values can provide a quicker steering response, but may produce an unstable steering feeling. Due to highly asymmetric loading on ovals, it’s not uncommon to have wildly different front Toe values on each front wheel to manage slip angle under loads. Generally, the right-front wheel will be able to utilize more toe-out than the left-front since it will see a much higher load in the corners.
后轮REAR CORNERS
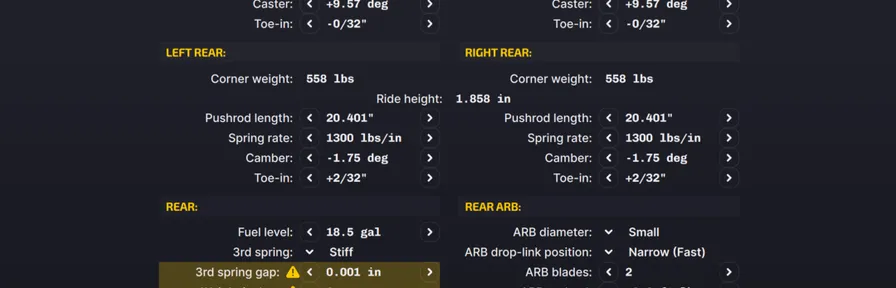
单轮重量
单轮重量表示车辆静置在车库中时各车轮承受的重量,可用于直观了解静态重量分布,并在设置过程中识别重量分布变化。
车高
后车高是从地面到车身中心线参考点的距离。车库只显示一个后车高,而遥测会像前部一样输出两个后轮车高。该数值不一定代表底盘最低点,因此不直接等于离地间隙,而是设置与空气动力学工作的参考。车高应足够低,以兼顾空气动力学和机械抓地力,同时又要避免一圈中底盘明显触地。升降后车高会影响空气动力学平衡、总下压力和阻力,修改时请查看空气动力学计算器。
推杆长度
可在后悬架推杆上增减垫片来改变长度,从而调整车高。这是非常精细的调整;尤其进行非对称调整时,应密切关注单轮重量与对角重量,确保不会改变重量分布。后部尤其需要留意单轮重量,因为车库只显示一个后车高值,无法直接看出左右侧倾变化。
弹簧刚度
弹簧刚度表示控制各车轮的悬架弹簧硬度,即将弹簧压缩特定距离所需的力(lb 或 N)。弹簧既防止底盘在载荷下触地,也控制底盘空气动力学姿态,并显著影响操控。后部较硬弹簧可减少空气动力载荷增加时车尾运动,但会降低机械抓地力,并可能在慢弯引起转向过度;较软弹簧会带来更多后端运动,可能不利于空气动力学,却能提高后轴机械抓地力、减轻转向过度,极端时也可能造成转向不足。
外倾角
外倾角是车轮相对于底盘中心的垂直角度。负外倾表示车轮顶部比底部更靠近底盘中心线,正外倾则相反。更大的负外倾能在倾斜方向上提供更高过弯力(提高高速弯稳定性),但角度过大可能降低加速牵引力。
IR18 同时用于椭圆和公路赛道,因此理想外倾设置会随赛道类型变化。公路赛道四轮均宜设为负外倾;椭圆赛道右侧轮胎应为负外倾,左侧轮胎应为正外倾。由于各轮承受的载荷不同,椭圆赛道外倾差值通常因赛道而异;载荷较低的轮胎通常无法承受与高载荷轮胎同样大的外倾。
前束
前束是俯视时车轮相对底盘中心线的角度。负前束表示轮胎前端比后端离中心线更远,正前束则表示前端更近。后轮内八能提高直线稳定性,但降低车辆入弯旋转倾向;较低内八值(趋向外八)可提升转向响应,却可能带来不稳定感。椭圆赛道载荷高度不对称,左右后轮采用差异很大的前束以管理载荷下的侧偏角并不罕见。右后轮外八、左后轮内八还能产生后轮转向,增加弯中偏航角,高速时可能带来空气动力学收益,但加油时可能引起转向过度。
CORNER WEIGHT
Corner Weight represents the weight on each wheel when sitting in the garage. This can be used to visualize the weight distribution under static conditions and help with identifying changes to weight distribution through the setup process.
RIDE HEIGHT
Rear Ride Height is a measurement from the ground to a reference point on the chassis centerline. For the garage, only one rear ride height is shown while telemetry output will show two rear corner heights similar to the front heights. Since this value doesn’t necessarily represent the lowest point on the chassis it does not specifically represent the chassis’ ground clearance, but is instead a reference for setup and aero work. It is important to have the ride height low for both aero and mechanical grip, but high enough that the chassis doesn’t make significant contact with the race track over the course of a lap. Raising and lowering the rear ride height will affect aerodynamic balance, overall downforce levels, and drag, so consult the Aero Calculator to see how a ride height change will influence handling when changing this value.
PUSHROD LENGTH
To adjust the Ride Height, shims can be added to or removed from the rear suspension push rods to change their length. This is a very fine adjustment, however close attention should be paid to Corner Weights and Cross Weight, especially when making asymmetric adjustments, to ensure weight distribution isn’t altered while changing the Pushrod Length. For the rear it is especially important to pay attention to the corner weights since changes to left-to-right tilt can’t be identified due to only having one ride height value for the rear.
SPRING RATE
Spring Rate is the stiffness of the suspension’s corner springs controlling each wheel. The value is a representation of how much force (Pounds or Newtons) required to compress the spring a specific distance. Springs are used to keep the chassis from contacting the track under the loads seen on track and to manage the chassis’ aerodynamic attitude, but their stiffness also has a major influence on the car’s handling characteristics. On the rear end, stiffer springs can keep the rear of the car from moving too much under increasing aerodynamic loads but will decrease mechanical grip and can cause oversteer in slower corners. Softer springs will result in more rear end movement, which can hurt aero, but will increase mechanical grip across the rear axle and reduce oversteer (or cause understeer, in extreme cases).
CAMBER
Camber is the vertical angle of the wheel relative to the center of the chassis. Negative camber is when the top of the wheel is closer to the chassis centerline than the bottom of the wheel, positive camber is when the top of the tire is farther out than the bottom. Higher negative camber values will provide more cornering forces in the direction of the tire’s camber (more stability in high-speed cornering), but may reduce on-throttle traction at high camber angles.
Since the Dallara IR18 runs on both ovals and road courses, the desired camber settings will change between track types. For road courses it is best to have all four wheels set to negative camber values. For Ovals, the right-side tires should be set to negative camber values while the left-side tires should be set to positive values. The difference in camber values on ovals will often change from track to track due to varying levels of load seen on each tire. Generally, if a tire sees less load it will not be able to work with as much camber as a more heavily-loaded tire.
TOE-IN
Toe is the angle of the wheels relative to the chassis centerline when viewed from above. Negative toe-in sets the front of the tires farther from the centerline than the rear of the tires while positive toe-in sets the front of the tires closer to the centerline than the rear of the tires. This setting can change the rear tire slip angle, with toe-in providing more straight-line stability but reduce the car’s tendency to rotate into a corner. Lower toe-in values (moving towards toe-out) can provide a quicker steering response, but may produce an unstable steering feeling. Due to highly asymmetric loading on ovals, it’s not uncommon to have wildly different rear Toe values on each front wheel to manage slip angle under loads. Rear-steer can also be influenced by the rear Toe values by toeing out the right-rear wheel and toeing in the left-rear wheel. This will increase yaw in corners, which can provide aerodynamic benefits at high speed, but can induce oversteer on throttle application.
后部REAR

燃油量
表示车辆载入模拟器时油箱中的燃油量。
第三弹簧
公路赛道可在悬架中增加由聚合物限位胶构成的第三弹簧。它只在升沉方向(垂直悬架行程)工作,可用来防止车辆在高空气动力载荷或赛道起伏、倾斜弯等垂直作用力下下沉过多。这样便可使用较软的车轮弹簧,从而提高过弯时的机械抓地力。椭圆赛道不提供第三弹簧。
第三弹簧间隙
第三弹簧间隙是第三弹簧元件在限位胶接触前必须压缩的距离;间隙越大,接合前需要的垂直行程越多。聚合物限位胶的刚度随压缩量增大而上升。该设置可细调悬架在高速、高空气动力载荷下通过路面凸起时的表现,减少车轮载荷变化。
Weight Jacker
Weight Jacker 安装在右后弹簧上,可在车内调整对角重量。正值对弹簧施加预载并降低对角重量,负值卸载弹簧并提高对角重量;车高也会相应变化,正值抬高右后,负值降低右后。公路赛道不提供此功能,且车辆要在车库通过技术检查必须设为零;在椭圆赛道可通过 F8 黑框中的“Weight Jacker”在车内调整。
FUEL LEVEL
This shows how much fuel will be in the fuel tank when the car is loaded in the sim.
3RD SPRING
For Road Courses a Third Spring element, in the form of a polymer bump stop, can be added to the suspension. This element works only in heave (vertical suspension travel) and can be set to prevent the car from dropping too far under heavy aerodynamic loads or vertical forces from track shape, such as dips or turn banking. Using the Third Spring in this way allows for softer corner springs to be used (since they won’t have to carry the full aerodynamic loads), increasing mechanical grip while cornering. The Third Spring is not available on Ovals.
3RD SPRING GAP
The Third Spring Gap is the distance the third spring element must compress before the third spring bump stop is engaged with higher gap values requiring more vertical travel before engagement. The Third Spring is a polymer bump stop and thus increases in rate as it is compressed, with low compression values having low spring rate and high compression values having a very high spring rate. This can be used to fine-tune the suspension’s behavior over bumps in the track surface at high speeds and high aerodynamic loads to help reduce changes in wheel load in these situations.
WEIGHT JACKER
The Weight Jacker is a device mounted to the right-rear spring that can be used to adjust the cross weight while in the car. Positive values will preload the spring and decrease the crossweight while negative values will unload the spring and increase the crossweight. The corresponding ride height changes will occur as well, with positive values raising the right-rear and negative values lowering the right rear. This adjustment is not available on road courses, and must be set to zero for the car to pass tech in the garage, but is available as an in-car adjustment on the F8 Black Box as “Weight Jacker”.
后防倾杆与外观REAR ARB & GRAPHICS
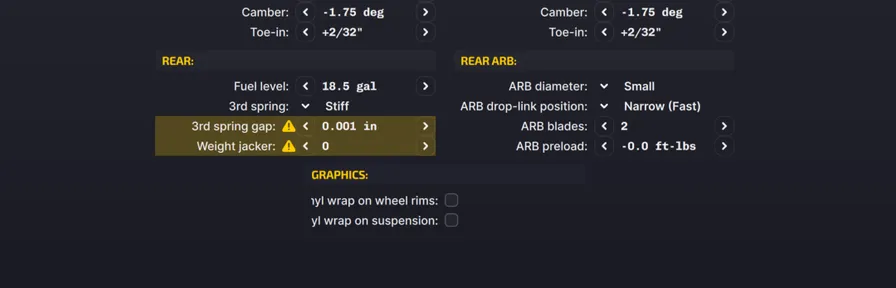
防倾杆直径
后防倾杆有大直径、小直径和拆除三种选项。大直径会提高后悬架侧倾刚度,降低机械抓地力并增加转向过度,但尽力让底盘过弯时保持平直。小直径降低侧倾刚度,提高后轴机械抓地力并减轻转向过度,但车身侧倾更大。拆除会大幅降低侧倾刚度,可显著提高后端机械抓地力并增加转向不足。如果拆除后防倾杆且后弹簧过软,入弯时可能抬起内侧前轮,导致制动锁死。拆除后,其他后防倾杆设置均不起作用。
防倾杆连杆位置
防倾杆连杆有两个安装位置。“Wide (Slow)”减慢受力速度,降低防倾杆总成有效刚度并减轻转向过度;“Narrow (Fast)”加快受力速度,提高有效刚度并增加转向过度。
防倾杆杆片
杆片方向有六档,从最软(1)到最硬(6)。数值越高越硬,增加转向过度;越低越软,减轻转向过度。可通过 F8 黑框中的“ARB R”在车内调整。
防倾杆预载
底盘调整经常会向防倾杆总成施加少量静态载荷。防倾杆预载可消除这些载荷,避免不对称表现。椭圆赛道也可用它向杆体施加静态载荷,以管理赛道倾角过渡中的对角重量变化。
轮圈贴图
勾选“Vinyl Wrap on Wheel Rims”会启用涂装模板中的对应区域并应用到轮圈,使轮圈显示不同于 iRacing Paint Booth 所选的颜色。此项不影响车辆性能。
悬架贴图
启用“Vinyl Wrap on Suspension”会将涂装模板中的对应区域应用到悬架臂,以纯色替代碳纤维纹理。此项不影响车辆性能。
ARB DIAMETER
The rear Anti-Roll Bar is available in three options: Large diameter, Small diameter, and None (ARB removed). The Large diameter option will stiffen the rear suspension in roll, reducing mechanical grip and inducing oversteer, but will try to keep the chassis flatter when cornering. The Small diameter option will reduce roll stiffness, increasing mechanical grip across the rear axle and reducing oversteer, but will allow the chassis to roll more. Removing the ARB will dramatically reduce roll stiffness but can provide a large increase in rear end mechanical grip and increase understeer. If the rear ARB is removed and the rear springs are too soft there is a chance of lifting the inside front tire on turn-in, which can result in a wheel lockup under braking. If the ARB is removed, all other front ARB settings have no effect on the chassis.
ARB DROP-LINK POSITION
The ARB drop-links can be mounted in one of two positions that will alter the ARB stiffness. The “Wide (Slow)” option will reduce how fast the ARB is loaded, reducing the effective stiffness of the ARB assembly and reducing oversteer. Changing to the “Narrow (Fast)” option will speed up the ARB, increasing effective stiffness and increasing oversteer.
ARB BLADES
The ARB blade orientation can be changed to one of six options to alter the stiffness of the ARB assembly. Represented numerically from softest (1) to stiffest (6), higher values result in a stiffer ARB while lower values soften the ARB. Stiffer settings will induce oversteer while softer settings will reduce oversteer. This adjustment is available as an in-car adjustment in the F8 Black Box as “ARB R”.
ARB PRELOAD
Adjustments to the chassis will often result in small static loads being applied to the ARB assemblies. The ARB Preload setting can be used to remove these loads to prevent any asymmetric behavior from the ARB. On Ovals it can be used to apply a static load to the bar and manage crossweight changes in banking transitions.
VINYL WRAP ON WHEEL RIMS
Checking the Vinyl Wrap on Wheel Rims will enable a section of the paint template and apply it to the wheel rims. This will result in the wheels showing a color other than what was chosen for the wheels in the iRacing Paint Booth. This has no effect on car performance.
VINYL WRAP ON SUSPENSION
Enabling Vinyl Wrap on Suspension will apply a section of the paint template to the suspension arms, replacing the Carbon Fiber texture with a solid color. This has no effect on car performance.
减振器DAMPERS
低速压缩
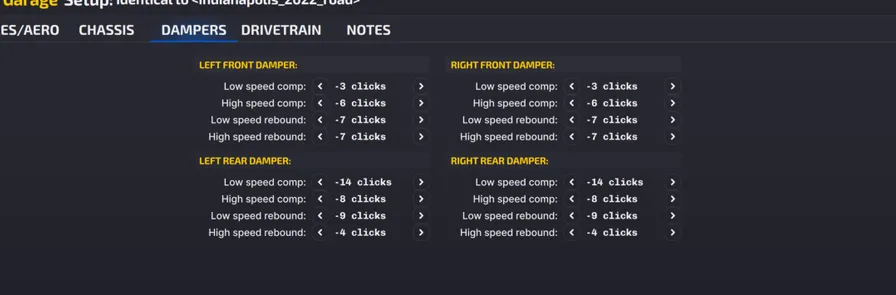
低速压缩控制减振器在较低运动速度下压缩(长度缩短)时的阻力,通常对应车手输入和空气动力载荷增加引起的车身运动。数值越高,低速状态下的压缩阻力越大;数值越低,减振器越顺应。从机械抓地角度看,提高前部低速压缩会在制动时产生转向不足,提高后部低速压缩则会降低加速牵引力并帮助车辆旋转。从空气动力学角度看,提高任一端低速压缩会减慢车辆在制动或加速时的垂直运动。
高速压缩
高速压缩影响减振器在高速行程中的表现,通常由压路肩或路面凸起引起。数值越高,悬架在这些情况下越硬,有利于防止底盘触地;数值越低,悬架越容易吸收冲击。较低数值有利于适应粗糙路面,但可能损害整圈空气动力学平台的一致性。
低速回弹
低速回弹控制减振器在较低速度伸长时的刚度,通常对应车身运动和空气动力载荷变化。数值越高,越能阻止减振器伸长;数值越低,减振器伸长越快。较高回弹能更好控制空气动力学姿态,但若悬架无法充分伸长以保持轮胎接地,可能使车轮卸载。
调校操控时,提高前部低速回弹会增加加速时的机械转向不足;较低数值能让前端抓地保持更久,减轻转向不足。后部则相反:较高低速回弹会减少制动时的后轮抓地,较低数值能在车身前俯时更好保持后轮抓地。较低回弹通常更有利于轮胎磨损,但可能损害空气动力学一致性;较高回弹能维持更好的空气动力学平台,却可能因悬架伸长不够快、车轮从路面弹起而产生不希望出现的振荡。
高速回弹
高速回弹调整减振器越过路面凸起和路肩后伸长时的表现。数值越高,减振器伸长越慢;数值越低,则越容易伸长。该值应足够低,以便车轮越过凸起后能及时回位,但不能高到让轮胎因悬架无法伸长而卸载。
LOW SPEED COMP
Low Speed Compression affects how resistant the shock is to compression (reduction in length) when the shock is moving at relatively low speeds, usually in chassis movements as a result of driver input and building aerodynamic forces. Higher values will increase compression resistance under these low-speed conditions more quickly, lower values will result in a more compliant shock. From a mechanical grip standpoint, more front low-speed compression will produce understeer under braking while more rear low-speed compression can reduce on-throttle traction to help rotation. For aerodynamics, more low-speed compression will slow vertical movement of either end of the car under braking or acceleration.
HIGH SPEED COMP
High Speed Compression affects the shock’s behavior in high-speed travel, usually attributed to kerb strikes and bumps in the track’s surface. Higher compression values will cause the suspension to be stiffer in these situations (good for keeping the chassis from contacting the track), while lower values will allow the suspension to absorb these bumps better. Lower values will help with compliance over rough surfaces but may hurt the aerodynamic platform’s consistency around the track.
LOW SPEED REBOUND
Low-speed Rebound damping controls the stiffness of the shock while extending at lower speeds, typically during body movement and changing aerodynamic loads. Higher rebound values will resist expansion of the shock, lower values will allow the shock to extend faster. Higher rebound values can better control aerodynamic attitude but can result in the wheels being unloaded when the suspension can’t expand enough to maintain proper contact with the track. When tuning for handling, higher front low-speed rebound can increase on-throttle mechanical understeer while lower values will maintain front end grip longer, helping to reduce understeer. The rear is the opposite, with more low-speed rebound reducing rear grip under braking and less low-speed rebound will maintain rear grip better while the chassis is pitching forward. Lower rebound settings are usually better for tire wear but can be a detriment to aerodynamic consistency. Higher rebound can maintain a better aerodynamic platform, but can lead to unwanted oscillations due to the wheel bouncing off of the track surface when the suspension can’t extend fast enough.
HIGH SPEED REBOUND
High-speed rebound adjusts the shock in extension over bumps and kerb strikes. Higher values will reduce how quickly the shock will expand, while lower values will allow the shock to extend more easily. This value should be set low enough that the wheels can return after a bump or kerb strike but not high enough that the tire becomes unloaded when the suspension can’t expand.
动力传动系统DRIVETRAIN
发动机与混合动力ENGINE & HYBRID
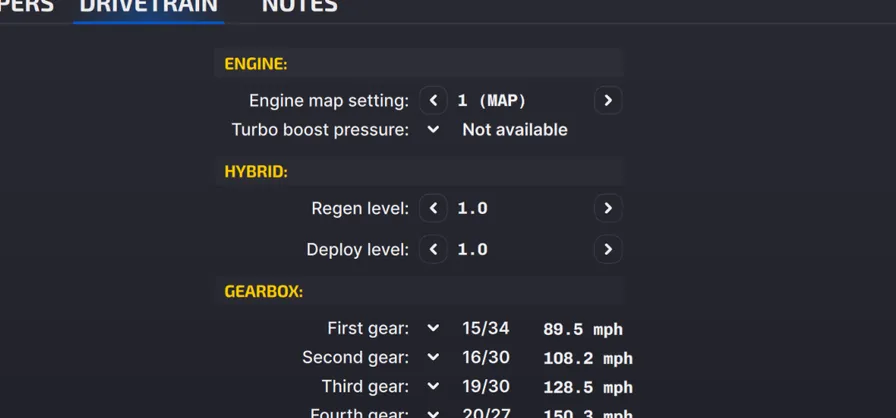
发动机映射设置
发动机映射可改变输送至发动机的燃油量,用于节省燃油。
- 设置 1:提供最大功率,但油耗最高。
- 设置 2-5:用于节省燃油。随着设置数值增加,发动机功率降低,燃油消耗也随之减少。
- 设置 6:全功率设置,但油门映射比设置 1-5 和设置 7 更线性。
- 设置 7:同样提供全功率,但油门映射比设置 1 和 6 更渐减。
- 设置 8:用于黄旗和暖胎圈,会大幅降低燃油流量和功率。
涡轮增压压力
在 Indianapolis Motor Speedway 椭圆赛道,发动机涡轮可使用产生更高功率的不同映射。该模式会产生更多热量并消耗更多燃油,不建议在正赛中使用。
能量回收等级
设置松开油门时混合动力系统自动回收能量的强度。1.0 表示完全回收,以下数值按完整强度的比例缩放(例如 0.5 为 50%)。
能量释放等级
设置手动激活能量释放时系统的释放强度。与回收设置相同,1.0 表示完全释放,以下各档均为完整强度的一定比例。
ENGINE MAP SETTING
The Engine Map Setting can be used to alter the amount of fuel sent to the engine for fuel-saving purposes.
- Setting 1 - This setting provides maximum power but the highest fuel consumption.
- Settings 2-5 - These settings are used for saving fuel. Engine power is reduced as the setting value increases, but the amount of fuel used is also reduced.
- Setting 6 - This setting is a full-power setting but with a more linear throttle map than settings 1-5 and setting 7.
- Setting 7 - This will also provide full power, but with a more digressive throttle map than settings 1 and 6.
- Setting 8 - Meant for cautions and pace laps, Setting 8 will dramatically reduce fuel flow and power.
TURBO BOOST PRESSURE
For the Indianapolis Motor Speedway oval the engine turbo can be set to a different mapping that will produce more power. This engine mode will generate more heat and use more fuel and isn’t recommended for Race sessions.
REGEN LEVEL
Sets how much automatic regeneration the hybrid system will have when lifting off the throttle, with 1.0 being full regen and values scaling down the rate from the full amount like a percentage (0.5 is 50% of full regen).
DEPLOY LEVEL
Sets how much the system will deploy under manual deployment activation. As with the Regen setting, 1.0 is full deployment and each setting below is a fraction of full.
变速箱GEARBOX

一至六挡
变速箱的六个挡位均可根据赛道条件或车手偏好调整。每个挡位以输入与输出齿轮的齿数比表示;较低传动比会降低加速能力但提高极速,较高传动比则提高加速能力但降低极速。选择挡位并单击“Apply”后,该传动比预计可达到的极速会在选项旁更新。
主减速比
差速器的齿轮比以主减速比表示。它在不改变各挡齿比的情况下改变整车的加速与速度特性。与变速箱齿轮相同,较高数值提高加速但降低极速,较低数值提高极速但降低加速。修改主减速比并单击“Apply”后,六个挡位的最高速度都会更新。
FIRST - SIXTH GEAR
All six gears in the transmission can be changed to suit track conditions or driver preferences. Each gear is represented by the ratio of teeth on the input and output gears, with lower ratios reducing acceleration but increasing top speed and higher ratios increasing acceleration but reducing top speed. Once a gear is chosen and the “Apply” button is pressed, the expected top speed the gear is capable of is updated beside the ratio choice.
FINAL DRIVE
The gear ratio on the differential is represented by the Final Drive ratio. This gear ratio alters the entire acceleration and speed profile of the car without changing the individual gears in the transmission. As with the transmission gears, higher ratios will increase acceleration but reduce top speed, while lower ratios will allow for a higher top speed but reduce acceleration. Changing the Final Drive gear and clicking “Apply” will update the maximum speed for all six transmission gears.
差速器(仅限公路赛道)DIFFERENTIAL (RC ONLY)

IR18 的后差速器可通过多项设置进行调整,这些设置都会显著影响车辆稳定性、加速表现和操控特性。它们仅在公路赛道和街道赛道可用;椭圆赛道使用不可调的直连式后轴。
离合器片
差速器离合器片能显著提高试图让两根后半轴保持同步锁止的作用力。与一组离合器片相比,所用片数会成倍放大锁止力。例如 4 片的锁止力为一片的 4 倍,12 片则为 12 倍。更高锁止力(更多片数)会在松开油门减速入弯时增加转向不足,但加油出弯时增加转向过度;片数较少则在减速入弯时增加转向过度,加油时增加转向不足。
预载
差速器预载是不论加速或减速都始终存在的静态锁止力。提高预载会在制动时增加转向不足、加油时增加转向过度;降低预载会在制动时增加转向过度、加油时增加转向不足。
斜坡角
斜坡角可分别调整减速与加速时的差速器锁止。数值分为“coast”(减速)和“power”(加速);角度越小,对应工况的锁止力越大,角度越大则锁止力越小。在 coast 一侧,更强锁止(较小角度)增加转向不足,更弱锁止(较大角度)增加转向过度;在 power 一侧,更强锁止会增加加油时的转向过度,更弱锁止则增加转向不足。两侧可相对独立选择,因此在已通过预载与片数调好全弯表现后,可用它精细调校入弯和出弯。
The rear differential for the IR18 can be adjusted through multiple settings, all of which can greatly affect the car’s stability, on-throttle performance, and handling characteristics. These adjustments are only available at Road Course and Street Circuits, with the car running a non-adjustable Spool rear-end at Ovals.
CLUTCH PLATES
The differential Clutch Plates are a way to greatly increase the forces from the differential that attempt to keep the two rear axles locked in sync. The number of clutch plates used will multiply the locking force by the number of plates in use when compared to a single set of clutch plates. For example, 4 clutch plates will have 4 times the locking force of one plate, 12 will have 12 times, etc. Higher locking forces (more plates) will increase the amount of understeer seen when off the throttle under deceleration for corner entry, but will increase oversteer on exit when applying the throttle. Fewer plates will increase oversteer on corner entry while decelerating but add understeer when applying the throttle.
PRELOAD
Differential Preload is a static amount of locking force that is always present in the differential regardless of acceleration or deceleration. Increasing the preload will add understeer under braking but oversteer on throttle application, while decreasing preload will add oversteer under braking but understeer on throttle application.
RAMP ANGLES
The Ramp Angles are a way to tune the differential locking on deceleration and acceleration with various configurations. The Ramp Angle values are split between “coast”, or deceleration, and “power”, or acceleration. Lower angle values will have more locking force for the situation that it is associated with, while higher angle values will have less locking force. For the “coast” adjustment, more locking force (lower ramp angles) will increase understeer while less locking force (higher angles) will increase oversteer. On the “power” side, more locking force will add oversteer on throttle and less locking force will increase understeer. Since these adjustments are somewhat independent of one another and can be chosen independently, this is a great way to fine-tune corner entry and exit once the whole corner has been tuned with the Preload and Plate number.
设置技巧SETUP TIPS
本节旨在帮助希望深入了解车辆各项设置的用户。
This section is aimed toward helping users who want to dive deeper into the different aspects of the vehicle’s setup.
设置技巧SETUP TIPS
传动比
主减速比与各挡齿比可按赛道特性调整。建议车辆在最长直道末端接近转速限制器。请注意,跟车吸流和/或 Push-to-Pass 可能提高极速,因此选择齿比时应为这部分转速增量留出余量。
空气动力学调整
同时调整前后翼片角度,在改变空气动力学平衡时可以增加或减少下压力,而不会显著改变操控平衡。若在修改前记录空气动力学计算器中的平衡百分比,调整后将其匹配回原数值即可增减总下压力;也可以有意设为高于或低于原百分比来改变空气动力学平衡。
计算器中更高的空气动力学平衡数值表示更靠前的平衡(更松/更易转向过度)。
机械调整
低速弯从空气动力学调整中获益较少,因此操控变化主要来自悬架设置。最简单的调整是防倾杆,它能显著改变操控平衡,而不会严重破坏空气动力学平台。
如需在低速弯增加转向过度,可使用更小的前防倾杆或更大的后防倾杆;更精细的调整可将钢制杆片换为钛制。若要增加转向不足,则使用更大的前防倾杆或更小的后防倾杆;精调时可从钛制杆片换为钢制。
差速器调整
差速器预载会对差速器施加静态锁止力,推迟或延长后差速器在加速和制动时保持锁止的时间。它可以非常有效地调整松开和踩下油门时的操控,而不影响底盘。
- 更高预载会减少制动时的旋转,但增加加油时的旋转。
- 更低预载会增加制动时的旋转,但减少加油时的旋转。
车高与第三弹簧间隙
IR18 可能在高载荷下触底。如果触底扰乱操控,或直线触底造成过多阻力,可提高静态车高或减小第三弹簧间隙,但这可能损害空气动力学效率。
同时增加左右推杆长度可抬高车高。若前后车高未等量调整,空气动力学平衡会改变(可在计算器中观察)。随着比赛中燃油消耗、车辆变轻,车高也会略微上升。
减小第三弹簧间隙会让渐进式限位胶更早接合,提高实际弹簧刚度。这能防止车辆在载荷下触底,但弯中限位胶接合过多会在粗糙路面上造成操控不稳定。
GEARING
Final drive and individual gears can be adjusted to suit track characteristics. It is recommended you are close to the limiter at the end of the longest straight. Keep in mind that top speed may increase in draft and/or on push to pass, so allow for this RPM increase when selecting gears.
AERODYNAMIC ADJUSTMENTS
Changing aero balance while adjusting front and rear flap angles together will add or remove downforce without significantly changing handling balance. If you note the aero balance percentage in the aero calculator before any changes you can add or remove overall downforce by matching that number after any changes, or purposely aim above or below the original percentage to change aerodynamic balance.
A higher aero balance value in the aero calculator indicates a more forward aero balance (loose/oversteer).
MECHANICAL ADJUSTMENTS
Lower speed corners will not benefit as much from aerodynamic adjustments, so handling changes will come strictly from the suspension settings. The simplest adjustments to make are the ARB settings, which will greatly affect the handling balance without significantly compromising the aerodynamic platform.
To add oversteer to low-speed corners, change to a smaller front bar or a larger rear bar. For a finer tuning adjustment, changing from Steel to Titanium blades will also induce oversteer. To induce understeer, run a larger front bar or a smaller rear bar, or switch from Titanium to Steel blades for a finer adjustment.
DIFFERENTIAL ADJUSTMENTS
Differential Preload will apply a static locking force to the differential and delay or extend the amount of time the rear differential is locked during acceleration and braking. This is an extremely effective adjustment to tune the car’s handling behavior during throttle release and application without affecting the chassis.
- A greater diff preload will decrease rotation under braking but increase on throttle rotation.
- A lower diff preload will increase rotation under braking but decrease on throttle rotation.
RIDE HEIGHTS AND THIRD SPRING GAP
The IR18 may bottom out under heavy load. If you find the handling is being upset by the car bottoming, or bottoming on a straight is adding too much drag, you can raise the static ride height or decrease the third spring gap, however this may hurt aerodynamic efficiency.
Raising ride height is achieved by increasing both the left and right pushrod length. Keep in mind that if the front and rear ride heights are not adjusted equally you will alter the aero balance. (This can be observed using the aero calculator.) The ride heights will also increase slightly over the course of the race as fuel burns off and the car becomes lighter.
Decreasing the third spring gap makes the progressive bump rubbers engage earlier which increases functional spring rate. This can keep the car from bottoming under load, however excessive bump rubber engagement at mid-corner can cause handling instability over rough surfaces.